
In keeping with that spirit, this school holidays a few ideas that combine the love of play with the love of science and which can all be made in your own home should a rain patch eventuate over the Easter-Autumn break or a patch of 'I'm bored' be similarly encountered.
For Youngsters
Lava Lamp
A lava lamp is a decorative lamp, invented in 1963 by British entrepreneur Edward Craven Walker, the founder of the lighting company Mathmos. It consists of a bolus of a special coloured wax mixture inside a glass vessel, the remainder of which contains clear or translucent liquid. The vessel is placed on a base containing an incandescent light bulb whose heat causes temporary reductions in the wax's density and the liquid's surface tension. As the warmed wax rises through the liquid, it cools, loses its buoyancy, and falls back to the bottom of the vessel in a cycle that is visually suggestive of pāhoehoe lava, hence the name. The lamps are designed in a variety of styles and colours.
As a 60th year celebration - how to make one at home. Idea courtesy National Science Week, which will run August 12 to 23 in 2023.
What you need:
- vegetable oil
- food colouring
- effervescing (fizzy) aspirin or vitamin tablets
- a glass tumbler or screw top clear jar with its lid
What to do:
- Fill a glass tumbler about 1/3 full with water.
- Add a few drops of colourful food dye.
- Slowly pour vegetable oil into the glass so that it floats on the water, until the glass is almost full (tip-ping the glass a little helps it form a neat layer).
- Drop a tablet into the glass.
- Cue disco lights and music.
Safety note: Don’t dispose of the oil and water down the sink. Pour it into a container that can be sealed before putting it in the bin. Better yet, add it to your compost.
What’s happening?
The bubbles in the water are carbon dioxide gas, formed when sodium bicarbonate and citric acid in the tablets react in the water:
acid + carbonate –> carbon dioxide + salt + water
C6H8O7 + 3NaHCO3 –> 3CO2 + Na3C6H5O7 + 3H2O
The bubbles take globs of coloured water with them up through the oil to the top of the glass. The gas bubbles burst at the surface and the coloured water drops then fall back down through the oil.
NB: You can recharge the lava lamp with another tablet when the first one has finished reacting.

An original Mathmos Astro lava lamp. Photo: November child
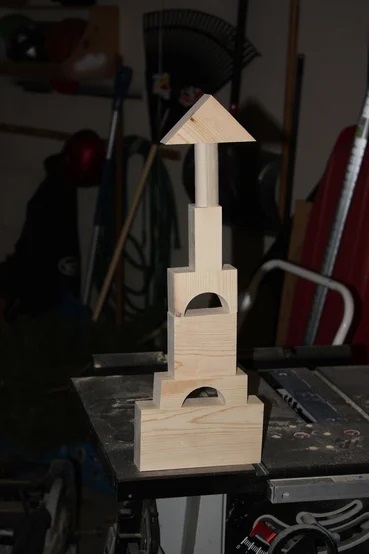
Wood Building Blocks for Toddlers and Older
For the youngster who has a younger brother or sister, how about making them something just for them these school holidays. These can be brightly painted with animals or lettered with the letters of the alphabet so you can teach your younger sibling all about those letters, or simply paint them a range of colours so you can share what yellow and red and green and blue is. OR you can make these in a variety of shapes to 'build' other things like spaceships and homes or animals themselves.
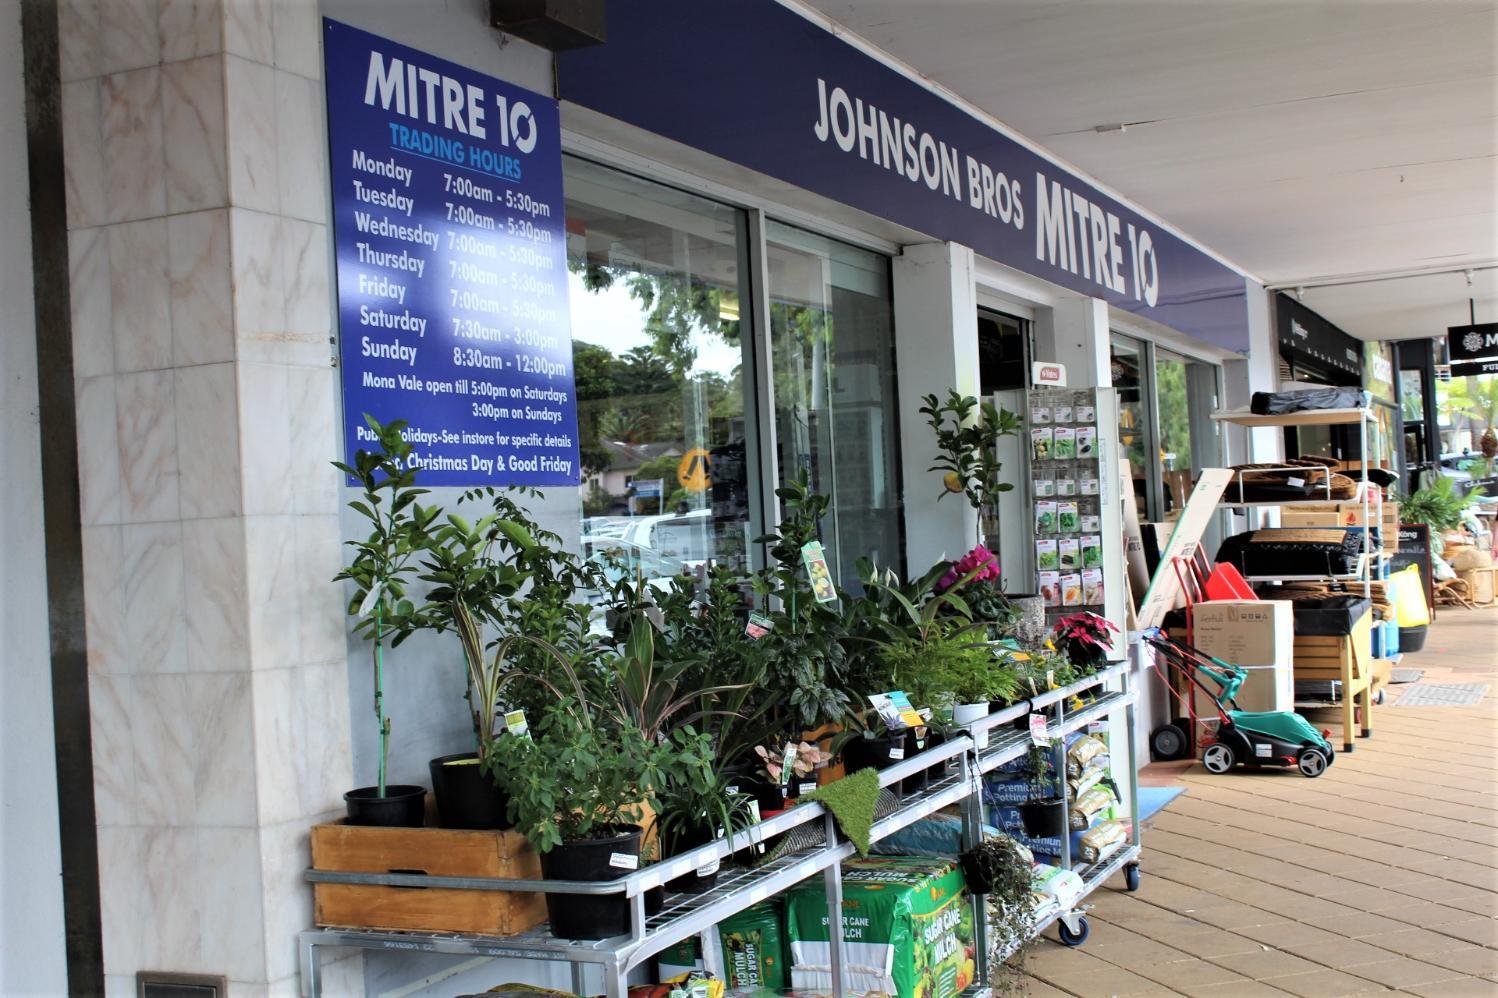
This is a great one for those who like 'mucking about with bits of wood' although you will need an adult to help you with the cutting of the wood part. The wood can be picked up from your local Johnson Brothers Mitre 10 hardware store - the one in Bassett street at Mona Vale has some great lengths of wood in a variety of wood types.
To make yours last, and even be turned into something else when everyone has grown tall, we recommend sealing them after the painting and decorating has been completed with a varnish of some sort. This also makes them easier to clean should sticky fingers have left some marks, such as strawberry jam, all over your blocks.
This version is for a castle or House of any sort and comes courtesy of Lee Schnitz on Instructables - you can just do simple square blocks to start with if you prefer, and of course, you can adjust sizings and shapes to suit what you want as well - this is simply a guide.
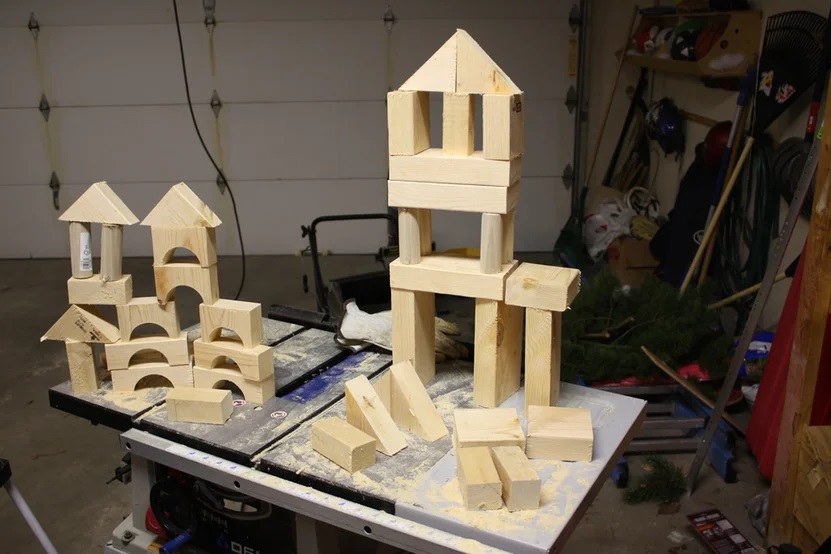
What you will need
- 1 - 90x45 length of Pine with 20 centimetres width - As straight, and ding free as possible. In American sizing this is a 2x4x8.
- 1 - 3.81 x 91 diameter hardwood dowel
Tools:
- Saws - Table and Miter, or hand saws and miter box
- Drill - Hand or Press
- Drill Bits - 3/8" and 2.5" hole bit
- Sander - Hand or Belt
Safety:
- Goggles
- Gloves
- Dust mask
Before we cut out our blocks, we need to determine the dimensions of our blocks.
As a 2X4 is really 1.5x3.5, most of the pieces use the 8.89cm width.
This are the dimensions used.
- Square: 8.89cm x 8.89cm
- Brick - 17.78cm x 8.89cm
- Triangle 8.89cm x8.89cm x 12.7
- Square Column 3.81cm x 3.81cm x 8.89cm
- Round Column 3.81x 8.89cm
- Long Bridge 12.7cm x 4.445cm
- Short Bridge 6.35cm x 8.89cm
What to do
Now that we have our block dimensions, we need to get to the cutting! I used my compound miter saw, if you don't have one, you can use a handsaw and a miter box.
First, I started by cutting all of my pieces that were 8.89cm long. To ensure a consistency in the length, I clamped a wooden block to my miter saw 8.89cm from the blade. This basically acted like a fence so I wouldn't have to measure and mark each individual piece. I used this fence to cut the square, the square that would become triangles, the round column and the square column.
For the square column, I had a piece of 2x4 I had previously ripped into a 3.81 x 3.81.
Second, I set the 'fence' to 12.7cm and cut four pieces that would become the bridge pieces.
Next, I set my wooden block 'fence' to 17.78cm and cut the brick pieces from the 2x4.
Lastly, I set the blade on the saw to cut at 45degrees. I then placed a square under the blade, and cut into two triangles.
At this point you should have all your pieces roughed out.
To create the bridge pieces we need two additional steps.
(1) Drill a 6.35cm hole in the centre of the block.
This can be accomplished by using a 2.5" hole drill bit. First, we need to find the center of the block. Easy enough.. just draw a line from corner to corner and find where they cross in the middle.
The drill bit I had was not deep enough to cut through a 2x4, so I had to drill from both sides. In order to ensure that the holes lined up, I drilled a 3/8 pilot hole completely through the centre and then proceed to use the hole bit on each side.
Both sides should meet up and now you are ready for step 2.
(2) Cut the blocks in half.
Using a table saw, cut the blocks in half. For a short bridge, set the fence to 2.5" For the long bridge, sent the fence to 1.75".
Get your push stick, and slowly cut the pieces in half.
Now you should have all your pieces cut out!
Since we don't want any splinters, it's time to sand. You have your choice when it comes to sanding. Feel free to use a table top belt sander (like me), or you can use a handheld power sander, or even a manual sanding block. Regardless of tool, the methods are the same.
(1) Start with a rougher grit like an 80, and then move on to a finer grit like a 120. And if you want to go even smoother, you can do a 240.
(2) Always sand with the grain.
(3) Wear dust mask. Its no fun breathing in all that saw dust.
Now that sanding is complete, you can finish as you see fit. You can go classic and just put on a nice coat of polyurethane. Or paint with some primary or pastel colours - make sure you use a non-toxic paint just in case any youngster teething decides to chew on them.
Give them to your favourite youngster, or youngster at heart, or keep them on your coffee table. They are almost IMPOSSIBLE to resist when they are done.
Enjoy! PS - special thanks to Max, my number one assistant and photographer.
Let's go Fly a Kite
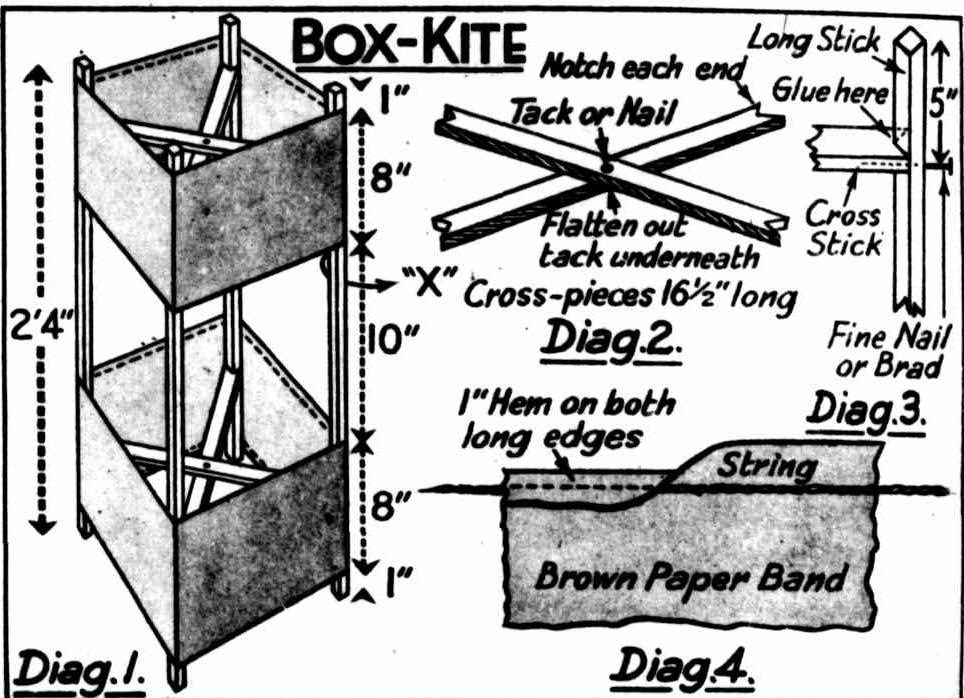
An oldie but a goodie. With Autumn settling in we get a lot of those change of seasons breezes and winds - perfect kite flying weather. The foundations of what it takes to build a kite were fundamental to Australians developing flight for humans. More in 2017 page ''Let's Go Fly A Kite'', which shares some of the history of box kites leading to human flight in Australia.
How To Make A Kite.
HOW TO MAKE A KITE
Things To Make And Do: KITES ARE IN— So Make This WHISTLING BOY KITE

SOMETHING TO MAKE: THE ARGUS JUNIOR - A BOX KITE
For Older Youngsters
Basic Wood Bookshelf
If there's one thing we need more of around here, it's bookshelves. In fact, we have books stacked on the floor due to a lack of bookshelves. These can also be used to store a variety of items - everything from toys, to ceramic art, to your own books on science and a microscope or anything else you want to store out of the way but where you can still see it when you need to find it. This project can be simple or elaborate - best to start with simple to begin with as then you can dream up more elaborate versions such as putting some shelves into half an old dinghy or canoe.
You can also source some old timber that can be recycled into this basic bookshelf and in doing so not only save that from being wasted but also source some beautiful woods that with a sand and polish or stain, will make this an outstanding feature wherever you use and for however long you need it. Putting in that little bit of extra effort to make something that is strong and durable, and will last a long time, proves that making your own bookshelf will not only give you something unique, it will also be a lot less expensive than buying one.
Remember these measurements can be customised to suit where you want t put your bookshelf too. If you want something wider and less tall, simply adjust to suit your uses.
Tools
Cordless drill
Cross head screwdriver bit
5mm and 3mm drill bits
Countersink drill bit
Dust mask
Earmuffs
Eye protection
Gloves
Hammer
Measuring tape
Orbital sander
Paint brush
Paint roller
Pencil
Roller tray
Router
T-square
Materials
2400mm x 1200mm x 17mm wood of your choice x2
2440mm x 1200mm x 4mm backing - you can use ply or even just leave this open- however, putting a back on will strengthen your bookshelf
Moveable bookcase/shelf lugs filler x8
6-8g 30mm chip board screws x18
25mm soft sheet nails
Masking tape
Paint or stain
180 grit sandpaper
Wood wax or polish
What to do
- Cut your timber to size.
Cut your 2400mm x 1200mm x 17mm form ply cut to:
- 2000mm x 295mm x 2
- 565mm x 3
- 563mm x 4
2. Measure and mark for the shelves: Take one of the long lengths of timber and measure out the positions for the shelves. This bookcase will include a fixed shelf in the centre and four other shelves. Measure and mark the halfway point, which is where the fixed shelf will go. Square this mark off with a pencil line. Measure and mark the positions for the other shelves.
3. Transfer the measurements: Line up the other unmarked length of long wood so that it's flush with the marked piece. Transfer the marks for the shelves onto the second piece of ply. This will ensure the shelves are straight and even when you install them.
4. Draw the lines for the shelves: Once you've marked the shelf positions on both side panels, lay them flat together on the bench and draw straight lines across the panels.
5. Mark for the shelf support holes: Use the square to mark the positions where you'll drill holes for the shelf supports. You'll need two supports for each shelf.
6. Drill the shelf support holes: When drilling the holes for the shelf supports, you need to be careful not to drill too deeply. A good tip is to wrap masking tape around the 3mm drill bit at the level you want. Now you can safely drill all of the eight holes for the shelf supports.
7. Assemble the frame: Two of the 565mm pieces of ply are for the top and bottom of the cupboard. Starting with the top piece, make sure it is flush with the end of the side panel and pre-drill holes using a 5mm bit. Then screw into place using 45mm screws. Attach the other side length panel to the top piece the same way. Then you'll need to add the bottom piece of ply in the same way. It's a good idea to use corner clamps to secure the frame while you're working or get some help from a friend to hold it steady.
8. Sand the bookcase; Once the frame is complete, sand it all over with the orbital sander and 180 grit sandpaper for a nice finish. Make sure you sand the shelf edges as well to remove any splinters.
9. Paint or stain the bookcase; Wipe the bookcase down to remove any dust before you start painting or staining. You'll need to use the masking tape where you're cutting in with a paint brush to ensure the lines are straight. Then use a roller to paint the larger areas. Apply as many coats as needed.
Attach the back to the bookcase
Once the paint is dry, flip the bookcase over to attach the back. Make sure the ply is flush on both sides, then hammer the 25mm soft sheet nails into place. Once the back is secure, use a router to remove any excess. Once the backing is trimmed to size, secure it with more nails.
Sand and wax the shelves
Give the shelves a quick sand and then wipe away any dust. Apply wax to the shelves, which will help to protect them and give them a great finish.
Install the shelves
Insert the shelf supports into the drilled holes, then place the shelves on top of them.
Sundial
For this project we'd recommend using a good weather-proof or treated wood, such as H3 pine, or a piece of stone you can mount on a plinth or post. This version, and there are many, comes from wikihow.
- Cut a 20-inch diameter circle out of wood or use a flat piece of stone to size you want. This circle or piece of stone will be the sundial’s face. Coat both sides of the wooden circle with primer. As the primer dries, think about what you want your sundial to look like. You will need to choose a number style, such as Roman numerals, standard numbers, and so on. Pick out the colours you want to use and, if you like, a drawing or illustration to put on the face. Sketch out a few different designs until you’ve settled on something final.
- Draw your final design on a large piece of circular paper. You will be using this as a stencil to transfer the design onto the wooden circle, so draw it to scale. Now you need to put the numbers onto the design, which will require some precise measuring. Use a straightedge and a protractor to do this. Start with the number 12 at the very top, like a clock’s face. Measure where the centre of the circle is, then use the straightedge to draw a precise line from the 12 to the centre.
- Use the protractor to measure exactly 15 degrees to the right. Mark the number 1 there. Use the straightedge to draw another hour line. Continue marking the numbers exactly 15 degrees apart. Move in a clockwise direction and use the protractor to continue marking off the numbers. Work your way around until you get to the number 12. This will be directly across from the first 12. These represent noon and midnight. Then start over with 1 again until you end up back at the original 12 at the very top. The numbers are now accurately marked onto the paper. The full 24 hours is represented for the most precise accuracy. When seasons change, so does the position of Earth. In summer, days are longer. In winter, they are shorter. There are days in the summer when there are more than 12 hours of daylight.
- Paint your design onto the wooden circle. Use your paper as a stencil so that the numbers and hour lines match what you’ve measured out precisely. Use paint markers to put the numbers onto the wood, since they will involve fine detail work. Paint markers are preferable to permanent markers, since they’re more resilient to the elements.
- Obtain the gnomon. The gnomon is the part of the sundial that will cast the shadow. It is a length of threaded pipe, and you’ll need it to be approximately two or three inches long. Its diameter should be a half inch. Make sure the diameter of the gnomon is slightly wider than the pipe itself. Improvise a conical tip. The length of the pipe and the gnomon tip should be no longer than 7.5cm total. Paint the gnomon in whatever colour you’d like. This will keep it from rusting.
- Prepare the sundial post for mounting. The post is what the sundial’s face, the wooden circle, will be mounted on. You will need a 4x4x8 pressure-formed wooden post that has been outdoor-treated. It needs to be perfectly straight and have no large cracks in it. To mount it correctly, the top of the post must be cut with a precise angle. To get this angle, subtract your current latitude from 90 degrees. For example, if you are located at 40 degrees N. latitude, you would draw a 50 degree angle on the 4x4.
- Cut the angle into the post. Draw a line at right angles using a carpenter’s square. Draw this line 15.25cm from the top of the post. The line is the bottom side of the angle. Use a protractor to measure it, then cut the angle with a table saw. Then measure the centre of the sundial’s face and drill a hole there. Test the attachment of the post to the sundial face with a 5/16-inch lag screw, just to make sure everything fits together properly.
- Dig a hole for the post. Find a sunny spot for your sundial and dig a hole for the post. Be sure you aren’t disturbing any buried cables or lines underground. Put the post in the hole. Test to make sure it’s no taller than five feet off the ground when standing erect. Use a compass to make sure the angle you cut into the post is facing north. Use a carpenter’s level to make sure the post is standing exactly vertical. Permanently put the post in place by pouring and setting it in cement. Allow a few days to go by before mounting the sundial face, so that the cement has dried completely.
- Attach the sundial face to the post. Use a 2cm by 5cm lag screw to attach the face. Tighten the screw enough so that it holds the face in place, but you are still able to turn the face easily. Place the flange directly over the sundial’s face. You should be able to see the lag screw in the flange’s centre hole. Use your right hand to screw the gnomon pipe into the flange, which you should hold in your left hand.
- Rotate the sundial face so that the 6 a.m. and 6 p.m. lines are horizontal. Then align the gnomon so that those same lines look like they are going straight through the centre. Make sure the line at 12 noon also looks like it is going directly through the gnomon.
- Set the time and attach the gnomon. You must set the time during Daylight Saving Time to read accurately. Hold the flange steady with your left hand. Use your right hand to turn the sundial face. Check the current time. Keep turning the face until the shadow of the gnomon shows the same time on the sundial. Use a pencil to mark where the four flange screws are and then take the flange away. Now tighten the lag screw. Do not move the sundial face as you do this. Drill holes for the four screws and then screw the flange onto the sundial. Lastly, screw the gnomon in.
A sundial is a horological device that tells the time of day (referred to as civil time in modern usage) when direct sunlight shines by the apparent position of the Sun in the sky. In the narrowest sense of the word, it consists of a flat plate (the dial) and a gnomon, which casts a shadow onto the dial. As the Sun appears to move through the sky, the shadow aligns with different hour-lines, which are marked on the dial to indicate the time of day. The style is the time-telling edge of the gnomon, though a single point or nodus may be used. The gnomon casts a broad shadow; the shadow of the style shows the time. The gnomon may be a rod, wire, or elaborately decorated metal casting. The style must be parallel to the axis of the Earth's rotation for the sundial to be accurate throughout the year. The style's angle from horizontal is equal to the sundial's geographical latitude.
The term sundial can refer to any device that uses the Sun's altitude or azimuth (or both) to show the time. Sundials are valued as decorative objects, metaphors, and objects of intrigue and mathematical study.
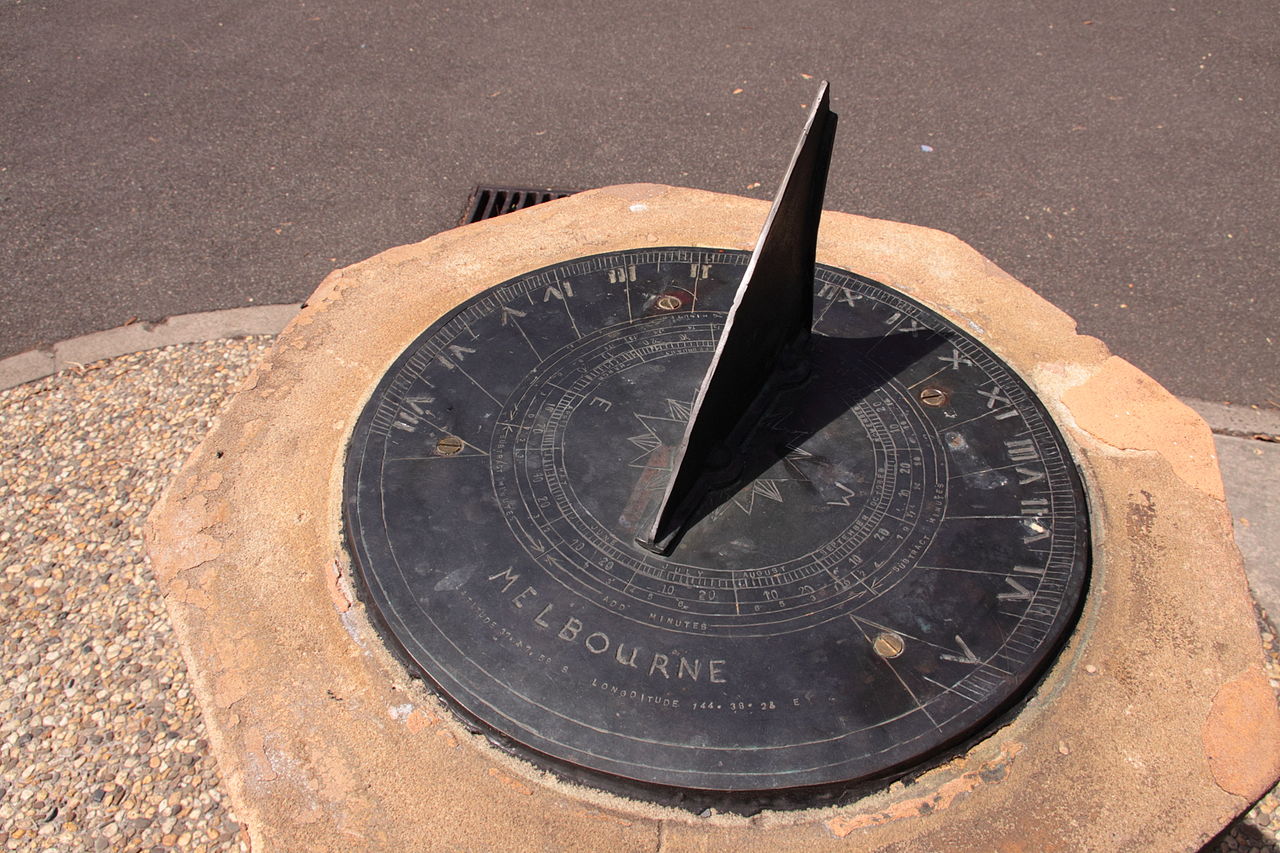
A horizontal dial commissioned in 1862, the gnomon is the triangular blade. The style is its inclined edge. This is the Melbourne sundial at Flagstaff Gardens. Photo: Jeepika.
For The Young At Heart
Some ideas you can do with children and grandchildren this Autumn school holidays.
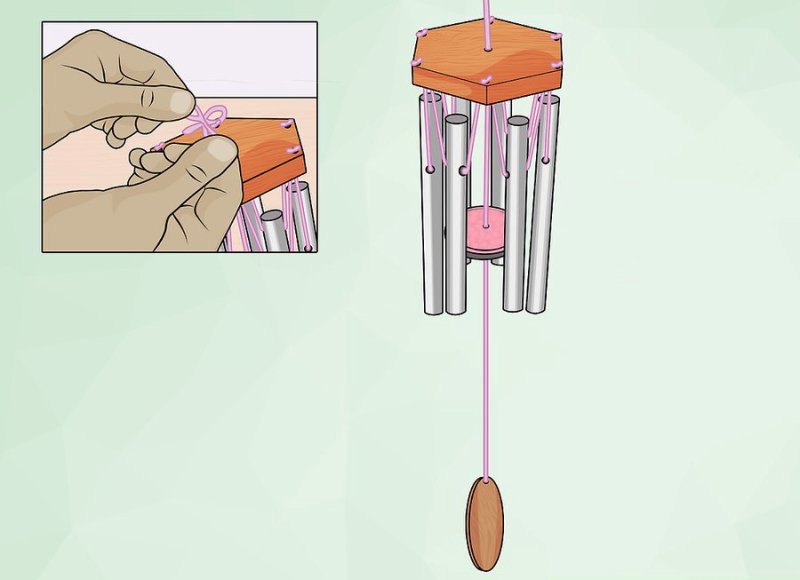
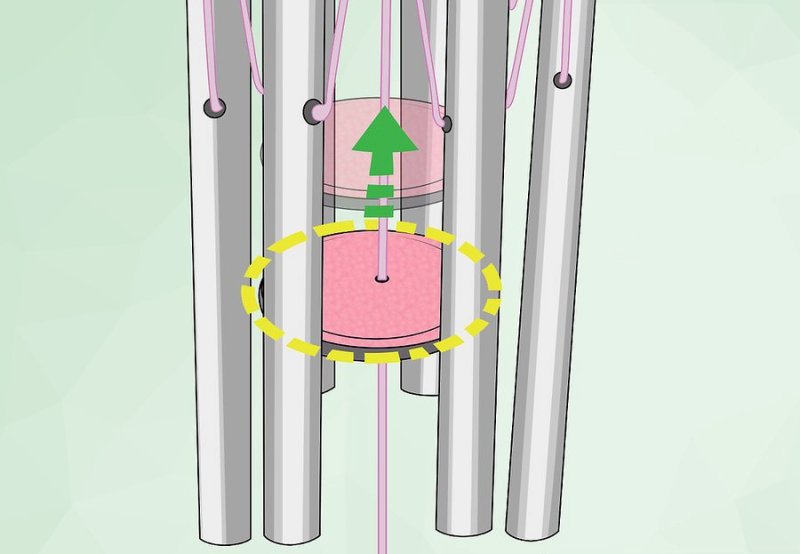
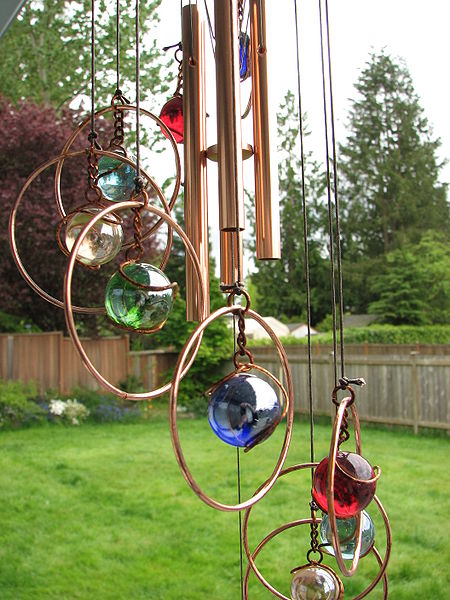 Making Your Own Windchimes


- Make Your Own Scooter or Skateboard: Summer 2016 Fun
- Blackboards for Children and Home
- DIY Child's Waggon - or use as a large planter mover
- DIY Wooden Toy Cars and Perfect Painted Flowerpots: School Holiday Fun - Winter 2015
- Classic Wooden Tool Carrier
- DIY Toy Box and Snow Globes: School Holidays Fun - Winter 2015
- Children’s Step Stool with Storage
- Go Outside And Play: Creating Garden Spaces To Connect Children With Nature
- DIY Dolls House Or Garage Or Boatshed
- Garden Ponds for Attracting Birdlife, Dragonflies and for the Soothing Sounds of Water
- DIY Coffee Table With Chessboard Inlay
- Classic Beach Garden and Camping Chairs 3 Portable Versions Anyone Can Make
The Johnson Brothers Mitre 10 Stores Stock All You Need For Garden Care This Autumn School Holidays
- includes specials in the Get Set for Ester and beyond Johnson Brothers - Mitre 10 catalogue, on special until April 16, 2023 - available to read here online


JBH Design Centre
JBH Design Centre is a tool for builders and DIY'ers to assist in the fit out of houses. It has displays of kitchens, Bathrooms, Doors and Storage as well as knowledgeable staff to assist in making house fit out painless.
Visit: http://jbhdc.com.au/
On Facebook: https://www.facebook.com/design.centre.jbh/


Click on logo to visit Johnson Brothers Mitre 10 website
Johnson Bros Mitre 10 - Avalon (02) 9918 3315
Johnson Bros Mitre 10 - Mona Vale (02) 9999 3340
JBH Timber & Building Supplies (02) 9999 0333
JBH Fencing & Landscape Supplies (02) 9970 6333
www.johnsonbros.com.au Online store: jbhmv.com.au

Previous DIY Pages:
Decking Timbers Caring For Your Deck Decking Finishes Privacy Screens I Privacy Screens II Privacy Screening Hardwoods Autumn Paths and Lawns Insulation Batts Plasterboard Ventilation - Edmond's Ecofan Blackboards for Children and Home Spring Lawn Care Shade Sails & Watering Basic DIY Tools DIY Tools - Power Drills Recycle Your Trampoline into An Air Bed How to Build Your Own Backyard Cricket Pitch Christmas Lights Displays around House and Garden Summer Mildew - Refresh, Renew How to Fix Things That Drip and Bump in the Night Time To Plant Winter Vegetables in a Raised Garden Beds Layout Organsing Your Tool Shed Make Your Own Weathervane Installing A Garden Watering System Decking Oils How To Make Garden Compost How To Winter proof Your Lawn How to create Shabby Chic effect on Timber Furniture How to Build Your Own Raised Garden Bed Growing Your Own Winter Vegies Winter Heating Guide Prepare Your Yard For Winter Eradicating Noxious Weeds From Your Yard How to Fix Furniture Finishes Part I How to Repair Scratches, Dings, and Dents of Furniture Surfaces - Part II Winter Draughts Fix Classic Wooden Tool Carrier Spring Garden Checklist Part I Install Your Own Skylight Retaining Walls for Saving Soil and New Spring Garden Beds Summer Salad Garden Native Plant Garden for A Fairy Arbour Renewing Short Flight of Exterior Stairs Deck Maintenance DIY Summer Tasks You Can Do In Time to Get to the Beach Garden Ponds for Attracting Birdlife, Dragonflies and for the Soothing Sounds of Water Salt Air: Maintenance and Protection Creating an Outdoor Dining Arbour, Gazebo or Patio - Part I Creating an Outdor Dining Arbour, Gazebo or Patio Part II Autumn Garden Tasks Autumn DIY Jobs: Waterproof Your Home Checklist Dealing With Dampness Inside the Home Fixing Your Fence Repairing and Replacing Damaged Decking boards DIY Toy Box and Snow Globes: School Holidays Fun - Winter 2015 DIY Wooden Toy Cars and Perfect Painted Flowerpots: School Holiday Fun - Winter 2015 Shoring Up an Under House Earth Bank – Installing a Basic Retaining Wall DIY One Shelf Sideboard Early Spring 2015 Garden Care Salad Garden For Children Keeping Your Garden and Home Cool in Hot Weather Classic Beach Garden and Camping Chairs 3 Portable Versions Anyone Can Make DIY Outdoor Furniture Mark I: Park Benches for Your Garden Make Your Own Scooter or Skateboard: Summer 2016 Fun How to Install a Solid Core Door and Door Furniture Summer Garden Jobs: Pruning A Hedge How to Make A Swing Chair - With A Frame for Garden Setting Garden Jobs for March to Make A Beautiful and Healthy Spring Keeping Outdoor Nooks Warm During Cooler Months Children’s Step Stool with Storage Stop Winter Rain Lawn Loss and Soil Erosion on Slopes DIY Garden Shed: Part 1 of 4 - Base DIY Garden Shed: Part 2 - Framing Walls DIY Garden Shed: Part 2b - Gable Roof Framing Garden Shed Part 3: Roof Installation DIY Garden Shed: Weather- boards - Door And Window Installation And Paint Finish DIY Coffee Table With Chessboard Inlay Spring Gardening: Feeding Your Soil And Plants - What Works For Each Plant DIY Sandstone Flagging Parking Area - Platform DIY Pre-Summer Checklist For A Safe Home Summer Spruce Up: Interior Paint Tips and Three easy steps to rejuvenate your timber deck The Perfect BBQ Garden Setting DIY Water Wise Garden DIY Side Gates DIY Storm Preparation And Home Protection One To Two Day DIY Weekend Spruce Ups Vegepods For Autumn Planting + Easy To Make Lego Table Or Student Desk That Can Be Dismantled + Johnson Brothers Mitre 10 Online Store Johnson Brothers Mitre 10 Great New Mona Vale Store: Still In Bassett Street - number 73 Johnson Brothers Mitre 10 New Mona Vale Store: The Greenlife Garden Centre Go Outside And Play: Creating Garden Spaces To Connect Children With Nature DIY Plasterboard Repair DIY Dolls House Or Garage Or Boatshed DIY Child's Waggon - or use as a large planter mover DIY Bathroom Refresh: Zing For Spring Tips for Growing a Native Garden FireCrunch, Australian Developed Fire-proof, Sustainable, Durable and Reliable Building Board Now Available at Johnson Bros. at Mona Vale and Narrabeen School Holidays DIY Ideas for Children: Little Vegetables Garden, Swing, Windchimes Bushfire Season Preparation 2017: Home and Outdoor Areas Johnson Brothers Mitre 10 Trade Centre at Mona Vale + Issue No 1 of Mitre 10’s inSITE Magazine for Tradies and Handymen Preparing Al Fresco Areas for Christmas Get-Togethers and Summer Visitors Summer De-bug; Mosquitoes, flies, cockroaches and ants - how to keep the outdoors insects where they belong DIY Summer Projects: Install A Fountain Or Water Feature Late Summer and Early Autumn Projects: A Shed For All Storage Solutions + Garden Tasks + Keeping Our Waterways Clean Autumn Plantings for Winter Harvests 2018 Paintback Collection Event: Johnson Bros Mitre 10 Mona Vale Saturday, April 7 Reducing Ticks in Your Garden: Garden care, Plants that Repel, What to Wear Outdoors Attracting Insectivore Birds to Your Garden: DIY Natural Tick Control Mother's Day 2018: DIY Rose Garden Winter Mould & Mildew Inside Your home: How to Keep Air and Surfaces Healthier DIY Traditional Rocking Horse Johnson Brothers Trade Day 2018 DIY Mushrooms and Vege Kits: School Holidays Fun Winter 2018 for Curious Kids Woodworking Projects for Beginners: School Holidays Fun Winter 2018 - Simple Storage Box + Wood Tool Box Spring Garden Prep: Soil Care Spring into Spring + JBH August 2018 Trifecta DIY Backyard Doggie Paradise Garden Care for Heavy Rain Days + Non-Toxic Snail and Slug Debug Ideas Garden Design and Plant Management to Minimise Tick Attacks and Infestations - insights from an essay by Bill Conroy BSc. (Agr) (Syd) + a Tribute to Wilfred Lawrence Conroy CBE by Keith Jackson, PNG and others Make Your Own BBQ Kitchen Garden: Gifts That Grow Past That Giving Day Christmas Lights 2018: Light Up the Night How to Keep Your House Cool During a Heatwave Without Using an Air-Conditioner Mid-Summer Garden Care 2018 Winners Of National Hardware Store Of The Year - Johnson Bros Mitre 10 Mona Vale! + End Of Summer Garden To Do List DIY Fruits of Your Garden: Growing Figs Fruits Of Your Garden: Growing Passionfruit - Autumn Is Also The Time To Plant Strawberries For Spring How To Water Your Plants When Away On Holidays + Some April 2019 School Holidays Fun For Outdoors; A Skateboard Swing Or Indoors; Grow Or Make Pot Plant People Dealing With Autumn Dampness Inside The Home + Mums Day Gifts For 2019 Winter Heating Guide + Get Ready For Winter Specials Keeping Your Garden Dewful During Times Of Water Restrictions and Drought Installing Leaf Stopper Gutter Guard + Trade Day 2019 JBH Mitre 10 Trade Day Guests 2019 An Artfull Garden - for Winter School Holidays 2019 DIY Deck Refurbishment: Turning Wood Into Open Tiled Spaces - Groundworks Father's Day Wish List 2019 + How to Re-stain your Deck timbers and posts for Summer Installing Posts For Decks and Verandahs With Heavier Loads + Installing Membranes For Tiled Decks National Garden Week's 2019 Focus Is On Children(Oct 13-19): Spring School Holiday 2019 Garden Ideas (to get started on) Replacing Balustrades Handrails DIY Tiling Your Verandah: and Choosing Your Simple Or Complex Tile Pattern Reduce Bushfire Risk To Older Homes + Preparing Your Yard For Bushfires Time to Put Up those Christmas Lights and Deck your Gum Trees with rows of Jolly! NSW RFS Bushfire Survival Plan 2020 + Reduce Bushfire Risk To Homes + Johnson Brothers Mitre 10 Great Water Saving Ideas during Level 2 water restrictions + some 'Don't Sweat Summer' Specials The Inaugural Sydney Edible Garden Trail - Learn how to help your garden survive the heat, drought, and water restrictions DIY Flyscreens DIY Privacy Screen In 2 Hours Family Hardware Store Wins Best In Australia Autumn DIY Jobs: Exterior Jobs to Keep Everything Dry and Cosy Inside the Home Autumn Vegepod Garden: Plant Now to Stay Healthy: JBH Response to COVID-19 Restrictions - We're Adapting! Autumn Holidays Projects: Let's Go Fly A Kite + Some handy Painting Tips for Interiors and Sprucing up that Outside Deck - Easter Hours 2020 Pittwater's Noxious Weeds: A Great Time To Get Outdoors and Pull Them Out and Replace With Native Plants Blooming Lovely: Late Autumn Planting For Gardens Full Of Colour, Cheer + Great Food For The Table Dealing With Dampness Inside The Home - June 2020 DIY A Job For Life: Apprentice Carpenter + Commencement Tool List Winter School Holidays 2020: Easy To Do Garden Mosaic Pavers Little Hands Can Create + Home DIYer: Simple Concrete Slab DIY - A Job For Life: Landscape Gardener Apprenticeship DIY Fathers' Day ideas for 2020 + August Garden Jobs DIY Job for Life: Plumber's Apprenticeship Early Spring Garden Care Spring 2020 + Salad Garden For Children A Job For Life: Certificate III In Electrotechnology - From Apprentice To A Business Owner; Jay Turns Up The Voltage On His Career + Spring Garden Specials - seedlings time! Spring is here and wattles are out in bloom: a love letter to our iconic flowers Perfect Tomatoes, Capsicums and Spring Onions - Summer Salad Staples + what to plant now BBQ Season: some tips to keep your New or Old BBQ Clean Christmas Lights Time 2020: Deck Your Home With Rows Of Jolly! Johnson Brothers Avalon Store Renovations & Mona Vale Store: Everything You Need This Summer In Stock How To Keep Your Home Cool During A Heatwave Dealing With Dampness Inside The Home: The Wet Summer Of 2020/2021 +Nothing By Halves, Johnson Bros. Mitre 10, great new video By Community Requests Autumn/February 2021 re-run: Garden Design and Plant Management to Minimise Tick Attacks and Infestations The Bees Knees: what you can plant now to help your garden grow and help the bees Dealing with Storm Events: Flooding inside and around the home - how to Be Prepared Fun Project Ideas for Autumn School Holidays 10 Ways to keep your home warm and save money this Autumn and Winter Mother's Day 2021 Ideas: Grow Her Some Lemons Or Avocadoes Or Get A Pink Step Ladder So She Can Safely Reach The Top Shelf Indoors + JBH Celebrates Upgrade Of Avalon Beach Store These 3 Tips Will Help You Create A Thriving Pollinator-Friendly Garden This Winter 'Generation Restoration' Is The UN's World Environment Day 2021 Theme: How You Can Help Out At Home The Johnson Brothers Trade Day Is Back: Thursday June 17th + How To Build A Nesting Box For Our Local Possums and Birds Winter School Holidays 2021: Fun Projects You Can Do Around The Home - Something For The Young and Even Younger Winter DIY Ideas: Painting A Feature Wall + Outdoor Heating Options For Your Home + Declutter/Organise That Tool Shed Science Week 2021 Food Theme: A Salad Garden For Children Early Spring Chores For Great A Summer Outdoors: Clean and Reseal Your Wooden Deck Area Early Spring Chores For Great A Summer Outdoors: Soil Preparation For Vegetables + Salads + A Few Other Tips To Make Your Garden Ready To Plant Out Spring School Holidays Projects 2021: A Swing Chair and Dolls' House or Toy Garage The Beer Ledge: Done In An Afternoon Projects For The Garden October- November Garden Jobs: Let's Get Busy Planting Out Now + Mow For Your Bros. This Movember Mow For Your Bros. This Movember: Some Lawn Care Tips To Keep Your Grass Greener This Summer - Aerate, Worm Up!, Fertilise, Watering, Mowing Basics Christmas-New Years 2021 Checklists: Preparing The Garden & Home - Entertaining - Gift Ideas For Every Budget DIY Backyard Cricket Pitch DIY Surfboard Rack: Vertical and Horizontal Options Late Summer - Early Autumn Garden Tips: BOM Forecasts Warm Autumn 2022 With Above Average Rainfall Dealing With Dampness Inside The Home March 2022 Maintenance Of Your Home's Outside Areas After Storm Events: Paths, Walls & Windows, Dampness Under The House, Dying Lawns And Plants - The DIY Checklist Fun Project Ideas for Youngsters for Autumn School Holidays: wooden cars, blackboards, bright painted herb pots, grow your own food, make a chessboard Mother's Day 2022: Promise Her An Ever Blooming Native Flowering Plants Garden Retaining Walls Save Your Garden's Soil: DIY Winter Draught Stops To Lessen Your Power Bill Johnson Brothers Trade Day 2022: June 16 At Mona Vale + Winter Garden Jobs For A Flowering Fruitful Spring Winter School Holidays Projects For Youngsters On Rainy Days Dealing With Dampness Inside The Home: Black Mould July 2022 Stop Winter Rain Soil Erosion In Your Garden - Especially On Sloping Blocks Increases In Building Materials Costs Adds Pressure To Fixed Price Contracts - Construction Industry Father's Day 2022 - Some Gift Ideas To Make Dad Feel Special; Some For Those Without A Single Dollar + Some For Those Who Get Pocket Money! Spring 2022: Time To Get In The Garden! What Can Be Done In September - For Youngsters + Oldsters Spring School Holidays 2022: Handmade Toys - For Youngsters + Oldsters Who Want To Lend A Hand Spring Lawn Care: During Mow For Your Bro Month - Movember 2022 Preparing Your Garden and Home For Bushfires 2022 - The Rains Will Cease; Now Is A Good Time To Clean Out Your Gutters + Prep. The Home Preparing Outdoor Areas For Christmas Get-Togethers and Summer Visitors: Wooden Decks, Tiles, Pavers, Outdoor Furniture, Putting Up The Christmas Lights, Garden Spruce Up Summer Garden-House Care: when to water, mow, when and how to harvest that crop, how to keep the ants, ticks and mozzies at bay this season + Christmas Gifts for all budgets and everyone + Johnson Brothers Christmas - New Years Trading Hours End Of Summer Garden To Do List For A Bountiful Indian Summer This Autumn End Of Summer Garden To Do List For The Lawn: How To Combat Armyworm + Small Jobs Boost Winter Resilience - Aerate, Weed, Feed, Patch Bare Spots A Dry Autumn Forecast: How To Look After Your Garden During Low Rain Seasons + What Plants Thrive In Dry Conditions
______________________
John and Bob Johnson - The Johnson Brothers Profile John William Alfred Johnson - The Eulogies for those who could not attend Mass
Australia's Prime Minister Visits Mackellar - Informal Afternoon Tea with Hon. Malcolm Turnbull October 2016
JBH Win Awards August 2018 Trifecta - 2018 Free Trade Day supporters, Mitre 10 Heritage Advert features JBH Mona Vale Store, Hardware Australia’s 2018 NSW Hardware Store of the Year over 2500sqm.
Front Page Issue 294: 2018 Winners Of National Hardware Store Of The Year - Johnson Bros Mitre 10 Mona Vale !!!
National Garden Week's 2019 Focus Is On Children(Oct 13-19): School Holiday Garden Ideas (to get started on) & Congratulations Award Winning Johnson Brothers Mitre10 At Mona Vale - 2019 NSW Store Of the Year, 2019 NSW Trade Centre Of the Year and 2019 Village Garden Centre of the Year
Johnson Bros Mitre 10 were awarded as the best Trade Store in the country: February 2020
Family Hardware Store Wins Best In Australia: Johnson Bros Mitre 10 Mona Vale Crowned ‘National Trade Store Of The Year’ - Celebrating 65th Year in 2020
Anzac Day In Pittwater 2020: Candles, Crosses and Online Commemorative Services: Johnson Brothers Family Donates 20 Thousand Candles to Community Light Up The Dawn Initiative
Front Page Issue 447: ANZAC DAY 2020
Front Page Issue 478: Johnson Brothers Avalon Store Renovations & Mona Vale Store: Everything You Need This Summer In Stock
Front Page Issue 492: JBH Celebrates Upgrade Of Avalon Beach Store