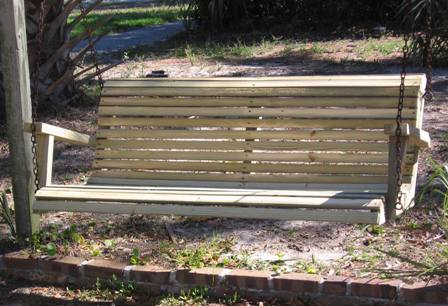
How To Build A Porch Swing With A-Frame For Garden Setting
Modified from version found on Wikihow The Porch Swing is a classic great outdoors seat that is still being made and used and when made well will last and make any nook or veranda into a special place. You can paint it or stain it, adjust the lengths and widths to suit yourself, and have something truly unique that just invites people to spend time enjoying the season outdoors.
You will also save yourself thousands of dollars in making this item and once you make one, you may dream up a few alternatives, such as pergola outdoor beds, or adjust lengths and widths and the A-framing to create little freestanding arbours. Although this version, when not part of a verandah, may be moved, this idea is for a permanent piece of garden furniture to highlight a corner of your garden, or turn that same corner into a private peaceful space.
If you are going to do the in-garden A-Frame version this project will take two weekends. It will be worth it though!
Warnings
Connections must be secure for safe use of the finished swing. If using the stand alone frame to place in your garden, we recommend cementing the base of poles into the earth to add safety and steadiness.
Never let small children play on this swing unattended; they may fall off, or it may swing into them. Use safety precautions when operating power tools and please use proper safety equipment to protect your ears, lungs and eyes when operating power tools or using paints and stains or sanding woods.
Materials List
- 24(twenty four) x: 25.4x102mm or 50x102mm (1x4in or 2x4) boards as long as the desired length of your swing (for seat slats)
- One 51x152mm (2x6in) board, 2.44m (8ft) long
- 30 (approximately) 76 or 89mm (3 or 3 1/2in) 12 gauge galvanised screws
- 180 (approximately) 51mm (2in) 8gauge or 10gauge galvanised screws
- 4 x 9.5mm x 76mm (3/8in x 3in) galvanized eye bolts with nuts and washers
- 2 x 9.5mm x 51mm (3/8in x 2in) galvanized eye bolts
- Length of chain (3/16in, 4.7mm) to hang swing or rope able to bear 500 pounds of weight if choosing to use rope
- Outdoors Paint or Stain
- A – 4 pieces of 4×4 timber – 2.70m long POSTS
- B – 2 pieces of 4×4 timber – 83cm long, 2 pieces – 11 1/2″ long BRACES
- C – 2 pieces of 4×4 timber – 77.70cm long SUPPORTS
- D – 1 piece of 4×4 – 2.74m long TOP BEAM
- 6 x 6.5cm galvanised screws
- 6 x 9cm galvanised crews
- Cement – if installing in garden
- 4 x posts for cement (optional)
- Wood stain or paint
- sandpaper
Tools List
- Circular saw
- Jigsaw
- Compound saw
- Sander
- Hammer
- Tape measure
- Square
- Level
- Drill with bits
- Carpenters pencil
- Spade
- Safety Equipment: eye goggles – ear muffs – mask to stop wood dust or timber stain fumes being inhaled
Preparation
1. Make sure your ceiling framing is strong enough to support your porch swing. A typical two-person swing can be supported by a single 2 x 8 joist, two 2 x 6 joists, or three 2 x 4 joists, provided all joists are adequately supported at both ends for load-bearing application.
Measure the space where you want to install your swing. This area will determine how long your porch swing will be. If the ceiling above your porch has joists, exposed beams, or any other structural elements with cracks running between them, you may want to make the bench a length that will allow you to centre the anchors for hanging the swing between the cracks. Also measure the distance behind the swing – allow room for it to swing if you wish to use for more than a gentle rocking motion. If you are installing on an A-Frame in an open garden space, allow 1.2 metre behind and before. For side clearance, allow at least 35 to 37 centimetres on either side of the swing.
Decide how deep the seat and how tall the back should be. Measure the seat and back of a similar chair that you feel comfortable in (e.g. a dining chair or a garden bench). The swing built over the course of these instructions is 508 mm (20 in.) deep in the seat and 457 mm (18 in.) tall in the backrest and 1 metre long. This sizing is ranged towards a tall individual and may need to be adjusted for people with shorter legs.
2. Choose the materials you will use for building your swing. There are now a great range of Australian treated timbers for outdoor use which will not destroy forests, will stop termites and product breakdown – discuss what will suit where you are best and how you want it to look when finished with the trained staff at Johnson Brothers Mitre 10. The sizing suggested here ensure the components are thick and strong enough to support the weight they may carry.
3. Decide how you want the bench to look – do you want just straight across slats or do you want to build in some horizontal slats to contrast with vertical slats. Here's a great idea for something just a little more fancy to look at but not much more difficult.
3. Gather all the tools, fasteners, and timber you need for the project.
Measuring and Cutting
1. Measure and cut the slats 50x100 mm (2x4 in.) boards the length you want the finished swing to be (1 metre in this case). Cut these boards to length, being careful to make all cuts square (90 degrees).
2. Cut the boards into slats for the seat and back. The seat slats need to be 19 mm (3/4 in.) wide, while the back slats (which support less weight) only need to be 12.7mm. (1/2 in) wide. For a seat 20 inches (508 mm) deep, you will only need about seat 17 slats (to allow for gaps between slats); for a back 18 inches (457mm) tall, you will only need 15 back slats. The version here uses 24 slats.
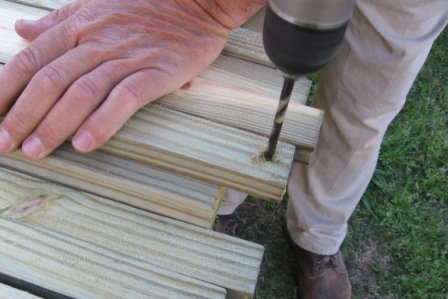
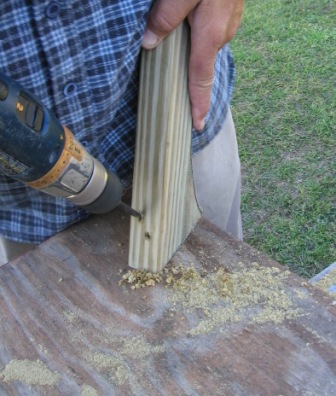
4. Drill through each slat, 25.4mm from both ends, with a 4.76 mm (3/16 in.) drill bit. Later, when you attach the slats to the frame with wood screws, these pre-drilled holes will keep the slats from splitting.
We recommend also drilling a hole in the dead centre of each slat to attach to a centre support. If you’re making a short bench and/or working with hardwood, a centre support may not be necessary. If in doubt, however, include one, this will ensure a stronger longer lasting piece of furniture.
5. Always sand these smooth when cut and even stain if you want a stained wood finish. This will ensure you apply enough wood-stain/paint prior to the slats being too close together to do this as effectively.
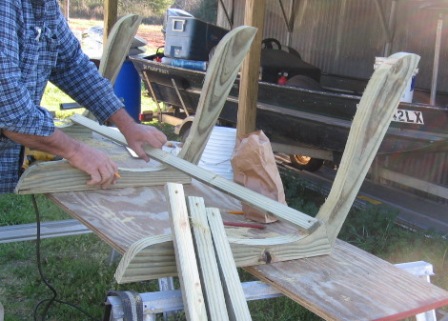
6. Cut 6x (six) 51x152mm (2x6 in.) back and bottom supports. If your bench only needs outer supports, cut two back and two bottom supports; if it also needs a centre support, cut three of each. The length of the back pieces should equal the desired height of the bench; the length of the bottom pieces should equal the desired depth of the seat.
7. Draw and cut curves into the back and bottom supports (optional). The bench in this example has gentle curves cut into the bench supports to make the bench more comfortable (and nicer to look at). The amount of curvature depends on your preference, but the seat and back can actually be straight if you prefer.
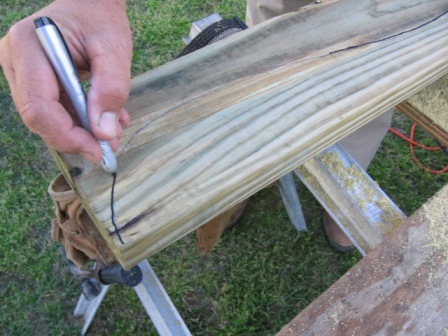
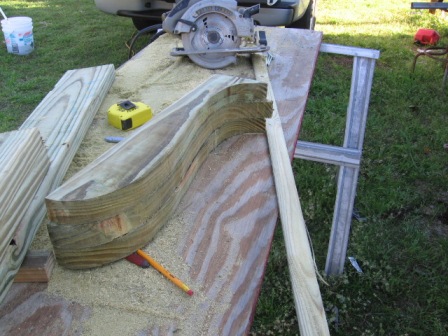
NB: If this seems too fiddly stick to just making straight back and base supports and throw a few colourful cushions on your finished item for a touch of panache.
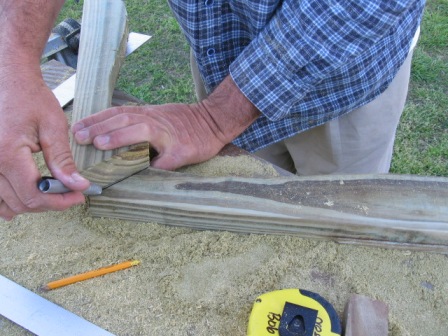
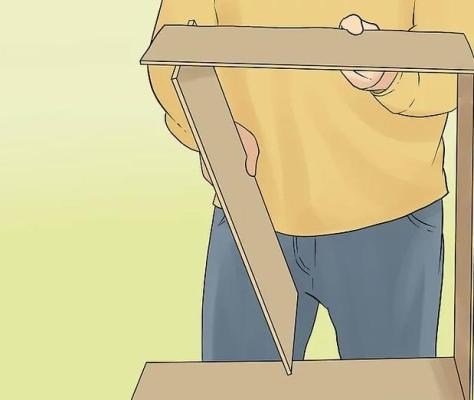
8. Cut a mitre at the ends of the back and the seat board. This is so the back and seat boards join at the correct angle for the amount of slant (recline) you want your seat to have. You can start by cutting a 45-degree angle into one of the two pieces, then laying it on top of the opposite piece and twisting it until you get the amount of angle you want.
The two angles may not be the same. This shouldn't matter since they are on the bottom rear of the swing, out of sight.
Putting the Swing Together
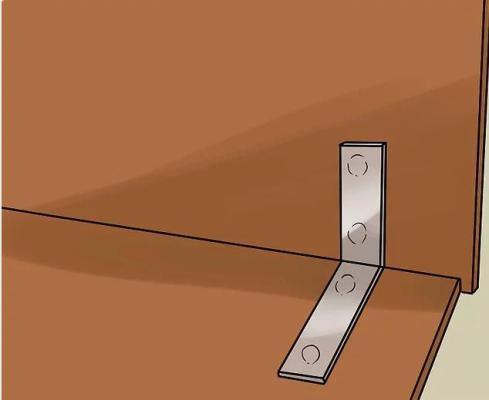
1. Attach the back supports to the bottom supports. Drill pilot holes for the screws that will join each pair of supports together, then fasten them with 89 mm (31/2 in.), 12 gauge Galvanised wood screws. This is a critical connection: since the screws are the only support for this joint, they will have a good bit of pressure in them. Depending on the length of the joint, you might want to insert the two screws at opposing angles. If you wish to add extra bracing with a bracket, do so. This too will add strength and longevity to your piece.
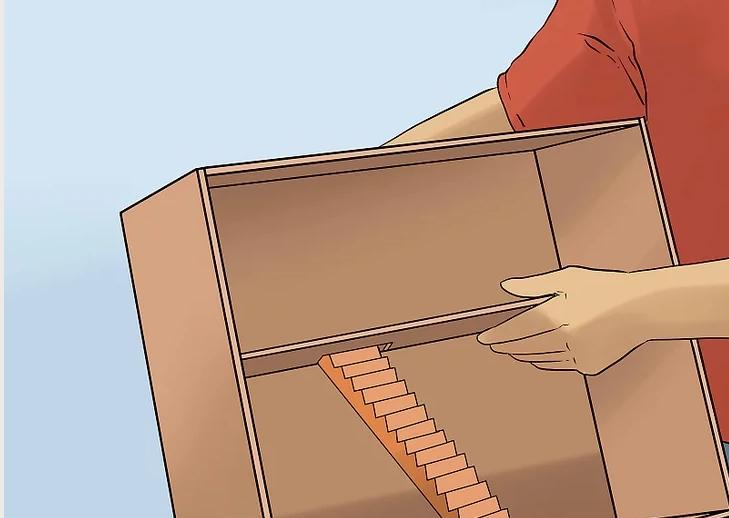
Unless you don’t mind cutting into the overhang to accommodate the armrests, don’t situate your slats so that they overhang both side supports. The armrests will later attach to the side supports, meaning the overhang will just get in the way.
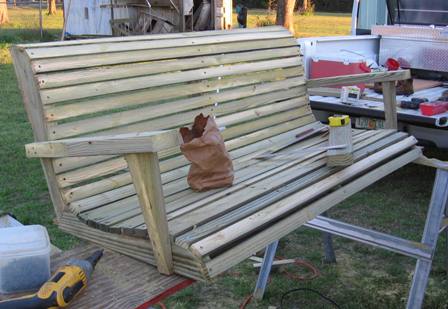
Space additional slats across the seat, leaving a 6.35 - 9.5mm space between them.
It’s a good idea to tack these on temporarily to get your spacing to worked out uniformly prior to attaching them permanently. Attaching the top-most back slat and front-most seat slat first before filling in the others might make it easier to keep your frame square. Take care to use the thicker strips for the seat, and the thinner slat strips for the back.
Armrests and Supports
To suit the swing chair sized here the armrest should be about 20cm (8 in) high and 50cm (18-20in) long.
1. Cut two wedge-shaped 50x100 mm (2x4 in.) boards about 33 cm (13 inches) long, tapered from 7mm (2 3/4 inches) on one end to 3/4 inch (19mm) on the other.
2. Cut two more boards 22in (56cm) long, tapered on one end from 1 1/2 inches (3.8cm) to full width in 10 inches (25.4cm) for each armrest itself.
3. Attach the armrests. Locate the height you want the armrest on the back frame, then locate the position you want the support on the seat portion of the frame. Attach these with 7.5cm (3in) 12 gauge wood screws. Fasten through the top of the armrest down into the support board with two more wood screws.
4. Drill a hole through the armrest support and the seat frame for the eyebolt. The eyebolt will attach your swing chain to the swing. Then, drill through the back frame for another eyebolt for the back chain. Screw in the eyebolts, place washers over the backs (to keep the nuts from drawing into the wood frame), and tighten the nuts over the ends with a wrench.
Safely installing the Chair Swing
Joist sizes
Porch and patio roof structures typically include horizontal joists that support the ceiling finish. Joists are often 2 x 6 or larger timber, but they can be as small as 2 x 4. If you have access to your porch structure through the attic, note the joist size and general placement. To hang a swing from a single joist or beam, it should be a 2 x 8 joist or 4 x 4 beam.
Finding the Joists
Locate the joists from the underside of the ceiling with a stud finder, then confirm each location by drilling small holes at each side of the joist. Make a mark at both side edges of the joist so you can find its center for installing the anchor.
Solving Joist Problems
Don't panic if your joists aren’t big enough, or if they don’t happen to fall where you need them— we've got you covered. You can:
1. Install short beams (4 x 4's work well) across the tops of multiple joists: Cut two 4 x 4 beams so they’re long enough to span across three or more joists (running perpendicular to the joists).
Set each beam on top of the joists so it is centred over one of the swing anchor locations. Fasten the beams to each joist with 3-inch screws driven at an angle through each side of the beam and into the top edge of the joist.
2. Install timber blocking (4 x 4's, 2 x 6's or larger timber) between two adjacent joists, using joist hangers, so the blocking is flush with the bottoms of the joists.
3. Mark the locations for the swing anchors onto one joist, and use a framing square to transfer the marks to the neighbouring joist (blocking runs perpendicular to the joists). Install joist hangers on the inside faces of the joists (the hangers will face each other), as directed by the hanger manufacturer; most are nailed to the joists with special 1 ½-inch hanger nails or screws. Position the hangers so the blocking will be flush with the top of the ceiling finish and cantered over the swing anchor locations.
4. Cut two pieces of blocking to fit snugly between the joists, and fit them down into the hangers. Fasten the blocking to the hangers with hanger nails or screws.
 To Install a Screw Eye or Hook
1. Drill a pilot hole directly into the centre of the joist or beam. Thread in the screw by hand as far as possible, then use a large wrench or pliers to turn the screw until the threads are fully embedded in the timber. You can also insert a tool handle into the eye or hook and use it as a lever to twist the screw.
To Install a Hanger Kit with Lag Screws
1. Hanger kits with swivel mounts are designed to mount to a joist or beam running parallel to the length of the swing. Position each mount over the centre of the joist or beam, and mark through the predrilled holes for the lag screws. Remove the mount and drill a pilot hole for each screw, using a bit that’s the same size as the screw’s shank (not the threads). Install the mount with 3-inch lag screws, tightening the screws with a socket wrench or impact wrench.
Hang the Swing
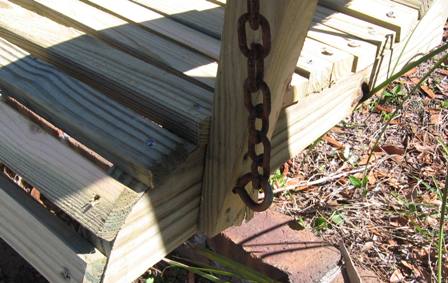
Hanging with chains requires two chains – one long and one short – for each end of the swing.
1. Secure one end of each long chain to the front mounting point of the swing, using an eye bolt.
2. Secure each short chain to the rear of the seat. Connect the short chain to the long chain on each side, about 2 or 3 feet above the seat (this is variable as desired), using small S-hooks or quick links.
3. With a helper or two, hook the long chains onto the hangers in the ceiling (or other support). The short chains pull backward on the long chains, causing the seat to tilt back for comfort.
4. Adjust the tilt and the seat height as desired by hooking onto different links.
Swings can hang from a single rope on each side.
1. Bend each rope in half and tie a simple overhand knot, using the doubled-up rope, 5 centimetres from the bend, to create a 5 cm-long loop. Hook each loop over the screw hook in the ceiling (or other support). If you have a screw eye or eye bolt, add an S-hook or quick link between the eye and the rope loop.
2. Prop up the swing on some boxes, check it’s level and at the desired height.
3. Thread the front half of each rope through the front mounting point on the swing and secure it underneath with a basic overhand knot. Make sure the knot is big enough so that it won’t slip through when there’s weight on the swing.
4. Remove the boxes and tie off the rear halves of the rope to the rear mounts on the swing, tilting the swing back at the desired angle.
5. Test the swing and adjust the knots as needed, then trim the excess from the bottom ends of the ropes.
Building an A-Frame
Buy the best quality timber you could afford. Most important is that the timber is suitable for outside use and strong enough for the job, which basically means the stock should be reasonably straight-grained and contain very few knots - definitely no big knots.
Your local Johnson Brothers Mitre 10 will be able to advise you on the most suitable types of timber available and also what safety precautions might need to be taken while working with any particular type of timber.
This support frame is a solid structure purpose made to hold a bench swing but it can have multiple other uses such as supporting a kids' swing set. Building an A-frame garden swing is a simple woodworking project, so any person with basic woodworking skills can get the job done in just a few hours or one day. There are many designs and shapes you could choose from, so we recommend you to study the alternatives before starting the actual construction. Dig holes in the ground and set the posts into concrete, to build a sturdy swing.
Plumb the A-frames with a spirit level before fitting the top beam, otherwise the corners won’t be right-angled.
Although this support frame is purpose-made for a particular bench swing, it can also be used to support numerous other utilities such as swings or maybe a glide-ride, and is even capable of accommodating certain types of gym equipment.
It is a very solid frame and basically consists of two end A-frames designed to minimize front and back movement, a beam which sits on top and two braces designed to minimize sideways movement.
The timber used in this project is 100 by100 (4x4) stock, which means that the timber is 100 millimetres (4") wide by 100 millimetres (4") thick. This is a very common stock size and should be readily obtainable from most timber or building supply yards. If you prefer to use smooth timber as opposed to rough, that generally means that the wood has been planed or dressed and therefore the size of the timber will be slightly smaller, but that does not matter.
1. The first step of the woodworking project is to build the posts for the A-frame. We recommend you to build the components from 4×4 timber. Cut the ends of the posts at 17º or to any other angle that fits your needs.
2. Make sure you cut a notch inside the top of the posts, otherwise you won’t be able to install the top beam.
3. The next step of the project is to fit the 4×4 braces between the A-frames. Cut the braces at 17º and fit them between the components. Drill pilot holes trough the exterior of the posts and insert 5″ galvanized screws into the braces. Make sure there are no gaps between the joints and add waterproof glue, if you want to get a professional result.
4. Install the posts into the ground. After you assemble the A-frames, we recommend you to set the posts in concrete. In this manner, you will create a rigid structure for the garden swing. Ours were set in 45cm-60cm deep holes in the ground before fitting the A-frames into place. If you don’t want to bury the legs into the ground, you should cut the legs at about 213cm long. However, you should keep in mind that the A-frame swing won’t be as rigid. You can alternatively attach 2×6 beams to the bottom of the legs to create a swing stand.
Plumb the frames with a spirit level and secure the frames temporarily with several braces. Pour concrete in the holes, level it with a trowel and let it dry out for several hours.
5. After the concrete has dried out, we recommend you to fit the top beam into place. Make sure the corners are right-angled, before drilling pilot holes trough the top beam and inserting the 15cm wood screws. Drill pilot holes through the top of the legs and insert 6.5 cm (2 1/2in) screws into the top beam. Place a spirit level on top of the beam, to check it is perfectly horizontal.
6. The last step of this garden project is to fit the top braces, in order to add support to the wooden construction. Cut both ends of the 4×4 supports at 45º and align it at both ends. Afterwards, drill pilot holes and insert several 9cm galvanized screws. Add waterproof glue to the joints, in order to increase the rigidity of the structure.
The A-frame swing has a nice appearance and a rustic look. If you choose the right location, this swing will enhance the look of your property.
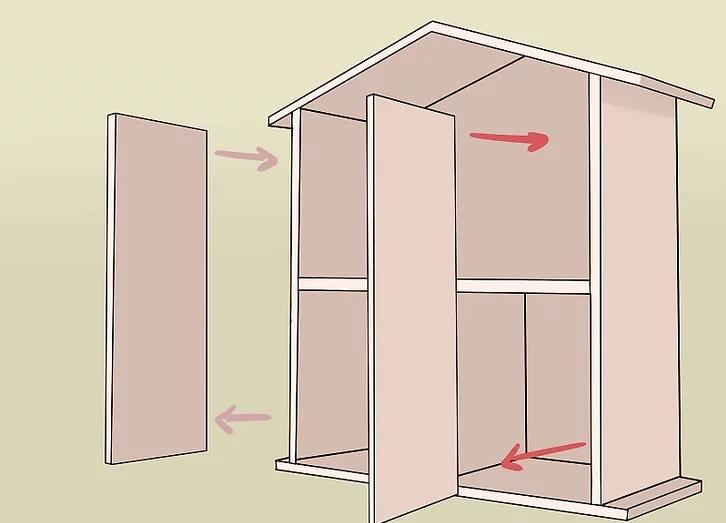
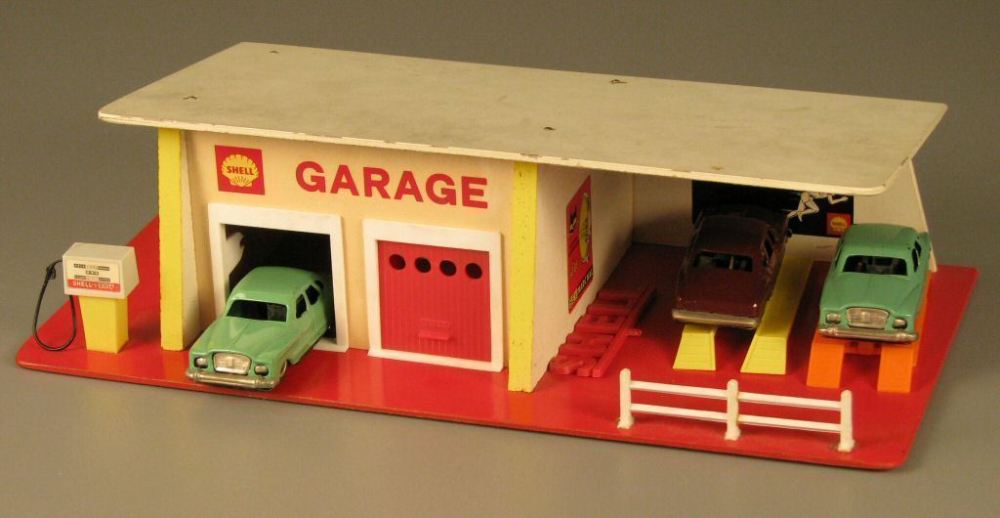
DIY Dolls House Or Garage Or Boatshed
- jigsaw
- drill
- rasp
- paint brushes
- screwdriver
- caulking compound gun / glue gun
- chisel
- mallet
- sharp knife (Stanley knife) and extra blades
- drill and drill bits
- set square
- wood clamps
- Wood
- Sandpaper
- Wood glue
- Hinges - L Brackets
- Dowel
- Paint
- 4 pieces of 19mm x 190mm lumber (at least 60cm long each
- 4 pieces of 30.48cm x 30.48 cm medium weight chipboard or similar material
- A drill with a 2.54 bit
- A hand, table, or jigsaw to make basic cuts in the wood
- 2.54 dowels (either a single stick or 8 single pieces)
- Sandpaper
- Wood glue
- Paint and other materials to create the finished look
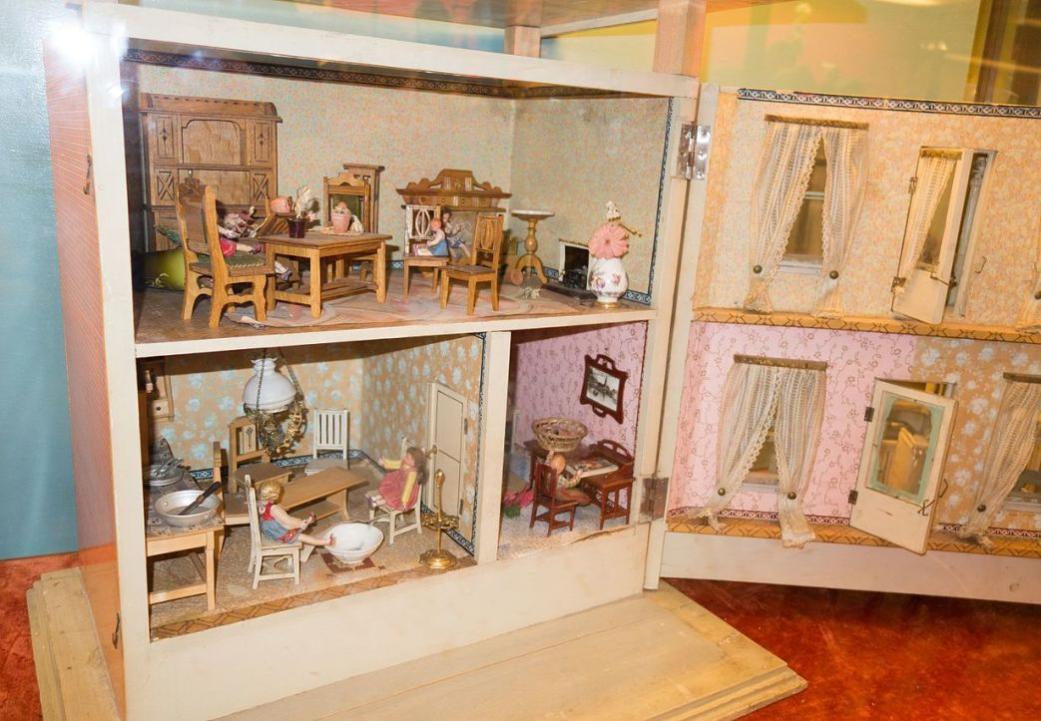
Queen Mary’s Doll House


Products And Tools To Help You Get It Done
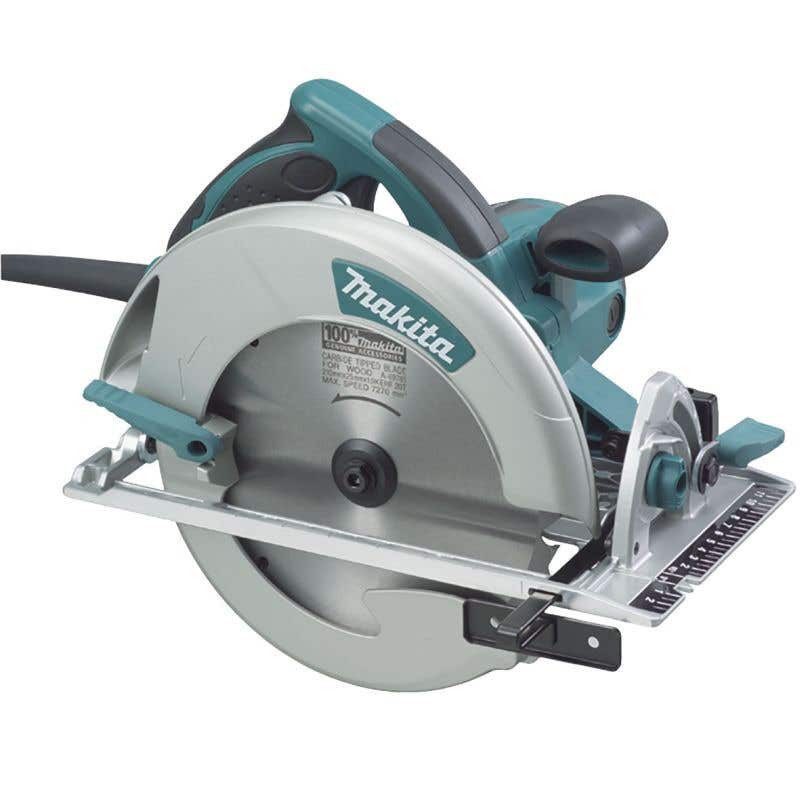
Makita 1800W Circular Saw 210mm: $389.00

Makita Belt Sander 100mm: $189.00
100 (4") x 610mm belt size. Belt speeds of up to 380m/min. Dependable 940W* motor. Unique design for flush to wall sanding

Stanley FatMax Level and Torpedo Combo 1200mm: $69.98
Aluminium. Waterproof. 3 Vials. Accuracy: 0.5mm/m


Gardenmaster Square Mouth Shifting Shovel 1020mm: $31.65
Ideal for shovelling heavy soils and sand. General purpose shovel for shifting, loading and spreading heavy to light materials. Long handle for extra leverage.

Cyclone Garden Fork: $65.70
Ideal for digging and cultivating most types of soil and great for aerating lawns.

Neutrog Whoflungdung Mulch 20kg: $21.95
Biologically activated. Nutrient rich. Weed free & absorbent mulch.

Debco Designer Natural Mulch 40L: $9.20
Decorates garden. Conserves water. Reduces weeds. Insulates soil.

Johnson Bros Mitre 10 Is Open
We understand that this is a tough situation for everybody and implore the community to be supportive of each other.
Following the recent NSW Health advice, as a provider of hardware, garden supplies and building supplies, we're pleased to say that all Johnson Bros Mitre 10 stores, Harper Timber and Narrabeen Trade Centre are operating as per our usual hours.
We count ourselves fortunate to be considered essential and will work responsibly to serve the community to the best of our ability.
FREE Retail Deliveries.
Shop online 24/7 through mitre10.com.au and receive FREE delivery for all online retail orders over $100 and under $40kg or pick up in store with our Click 'n' Collect service.
We do remind customers that when instore to please adhere to the following: wear a mask, use the hand sanitiser provided, maintain social distancing, check in with the QR code.


Johnson Brothers Mitre 10: Shop Online Options
Intending to keep our customers and staff safe, we present some additional ways for both our retail and trade customers to do business with us.
Trade and Retail Pick Up
Express Pick up Mona Vale
- Call Johnson Bros Mitre 10 Mona Vale, and we will pick & pack your order and have it ready for you to pick up in 2 hours. (Stocked Lines Only)
- Drive into our undercover Trade Drive-Thru area at 73 Bassett St Mona Vale, and your order will be ready for pick-up.
- Our team members will help you with your load and finalise payment/paperwork
Express Pick up Avalon
- Call Johnson Bros Mitre 10 Avalon, and we will pick & pack your order and have it ready for you to pick up in 2 hours. (Stocked Lines Only)
- Drive into our back lane off Bellevue Avenue, and your order will be ready for pick-up.
- Our team members will help you with your load and finalise payment/paperwork
Online Retail Stores Go Live
We’ve launched two eCommerce sites offering 2hr pick up in-store and flat rate delivery options on the northern beaches*.
Jbhmv.com.au (Mona Vale)
Jbhav.com.au (Avalon)
With the ability to leave the product on your doorstep, this provides an option of an entirely contactless transaction.
*Flat rate delivery is not available to trade sales, building supplies and trade quantities
** The stock availability is updated nightly, which may mean the stock is unavailable when the order is placed
Trade Delivery to Site
Maybe not new, but certainly worth a mention again!
We can get almost anything delivered quickly onto site!
As always ring the trade desk direct on 9999 0333 and let them know what you need!
Final Thought
Like everyone, we have found ourselves in a new and uncertain environment, but we’re setting up (and digging in) for the long haul!
We want to acknowledge that the decision to retain over 120 staff and meet any future challenges head-on, could not have happened without the continued support you provide us as customers.
Thank you and stay safe,
The Johnson Family

JBH Design Centre
JBH Design Centre is a tool for builders and DIY'ers to assist in the fit out of houses. It has displays of kitchens, Bathrooms, Doors and Storage as well as knowledgeable staff to assist in making house fit out painless.
Visit: http://jbhdc.com.au/
On Facebook: https://www.facebook.com/design.centre.jbh/


We want to thank all of you for supporting and trusting us through this 2020, without you we could not be receiving these two important awards.
Thank you for being our customer and thanks to all our great staff for making this possible especially though this full of surprises year.


Click on logo to visit Johnson Brothers Mitre 10 website
Johnson Bros Mitre 10 - Avalon (02) 9918 3315
Johnson Bros Mitre 10 - Mona Vale (02) 9999 3340
JBH Timber & Building Supplies (02) 9999 0333
JBH Fencing & Landscape Supplies (02) 9970 6333
www.johnsonbros.com.au Online store: jbhmv.com.au

Previous DIY Pages:
Decking Timbers Caring For Your Deck Decking Finishes Privacy Screens I Privacy Screens II Privacy Screening Hardwoods Autumn Paths and Lawns Insulation Batts Plasterboard Ventilation - Edmond's Ecofan Blackboards for Children and Home Spring Lawn Care Shade Sails & Watering Basic DIY Tools DIY Tools - Power Drills Recycle Your Trampoline into An Air Bed How to Build Your Own Backyard Cricket Pitch Christmas Lights Displays around House and Garden Summer Mildew - Refresh, Renew How to Fix Things That Drip and Bump in the Night Time To Plant Winter Vegetables in a Raised Garden Beds Layout Organsing Your Tool Shed Make Your Own Weathervane Installing A Garden Watering System Decking Oils How To Make Garden Compost How To Winter proof Your Lawn How to create Shabby Chic effect on Timber Furniture How to Build Your Own Raised Garden Bed Growing Your Own Winter Vegies Winter Heating Guide Prepare Your Yard For Winter Eradicating Noxious Weeds From Your Yard How to Fix Furniture Finishes Part I How to Repair Scratches, Dings, and Dents of Furniture Surfaces - Part II Winter Draughts Fix Classic Wooden Tool Carrier Spring Garden Checklist Part I Install Your Own Skylight Retaining Walls for Saving Soil and New Spring Garden Beds Summer Salad Garden Native Plant Garden for A Fairy Arbour Renewing Short Flight of Exterior Stairs Deck Maintenance DIY Summer Tasks You Can Do In Time to Get to the Beach Garden Ponds for Attracting Birdlife, Dragonflies and for the Soothing Sounds of Water Salt Air: Maintenance and Protection Creating an Outdoor Dining Arbour, Gazebo or Patio - Part I Creating an Outdor Dining Arbour, Gazebo or Patio Part II Autumn Garden Tasks Autumn DIY Jobs: Waterproof Your Home Checklist Dealing With Dampness Inside the Home Fixing Your Fence Repairing and Replacing Damaged Decking boards DIY Toy Box and Snow Globes: School Holidays Fun - Winter 2015 DIY Wooden Toy Cars and Perfect Painted Flowerpots: School Holiday Fun - Winter 2015 Shoring Up an Under House Earth Bank – Installing a Basic Retaining Wall DIY One Shelf Sideboard Early Spring 2015 Garden Care Salad Garden For Children Keeping Your Garden and Home Cool in Hot Weather Classic Beach Garden and Camping Chairs 3 Portable Versions Anyone Can Make DIY Outdoor Furniture Mark I: Park Benches for Your Garden Make Your Own Scooter or Skateboard: Summer 2016 Fun How to Install a Solid Core Door and Door Furniture Summer Garden Jobs: Pruning A Hedge How to Make A Swing Chair - With A Frame for Garden Setting Garden Jobs for March to Make A Beautiful and Healthy Spring Keeping Outdoor Nooks Warm During Cooler Months Children’s Step Stool with Storage Stop Winter Rain Lawn Loss and Soil Erosion on Slopes DIY Garden Shed: Part 1 of 4 - Base DIY Garden Shed: Part 2 - Framing Walls DIY Garden Shed: Part 2b - Gable Roof Framing Garden Shed Part 3: Roof Installation DIY Garden Shed: Weather- boards - Door And Window Installation And Paint Finish DIY Coffee Table With Chessboard Inlay Spring Gardening: Feeding Your Soil And Plants - What Works For Each Plant DIY Sandstone Flagging Parking Area - Platform DIY Pre-Summer Checklist For A Safe Home Summer Spruce Up: Interior Paint Tips and Three easy steps to rejuvenate your timber deck The Perfect BBQ Garden Setting DIY Water Wise Garden DIY Side Gates DIY Storm Preparation And Home Protection One To Two Day DIY Weekend Spruce Ups Vegepods For Autumn Planting + Easy To Make Lego Table Or Student Desk That Can Be Dismantled + Johnson Brothers Mitre 10 Online Store Johnson Brothers Mitre 10 Great New Mona Vale Store: Still In Bassett Street - number 73 Johnson Brothers Mitre 10 New Mona Vale Store: The Greenlife Garden Centre Go Outside And Play: Creating Garden Spaces To Connect Children With Nature DIY Plasterboard Repair DIY Dolls House Or Garage Or Boatshed DIY Child's Waggon - or use as a large planter mover DIY Bathroom Refresh: Zing For Spring Tips for Growing a Native Garden FireCrunch, Australian Developed Fire-proof, Sustainable, Durable and Reliable Building Board Now Available at Johnson Bros. at Mona Vale and Narrabeen School Holidays DIY Ideas for Children: Little Vegetables Garden, Swing, Windchimes Bushfire Season Preparation 2017: Home and Outdoor Areas Johnson Brothers Mitre 10 Trade Centre at Mona Vale + Issue No 1 of Mitre 10’s inSITE Magazine for Tradies and Handymen Preparing Al Fresco Areas for Christmas Get-Togethers and Summer Visitors Summer De-bug; Mosquitoes, flies, cockroaches and ants - how to keep the outdoors insects where they belong DIY Summer Projects: Install A Fountain Or Water Feature Late Summer and Early Autumn Projects: A Shed For All Storage Solutions + Garden Tasks + Keeping Our Waterways Clean Autumn Plantings for Winter Harvests 2018 Paintback Collection Event: Johnson Bros Mitre 10 Mona Vale Saturday, April 7 Reducing Ticks in Your Garden: Garden care, Plants that Repel, What to Wear Outdoors Attracting Insectivore Birds to Your Garden: DIY Natural Tick Control Mother's Day 2018: DIY Rose Garden Winter Mould & Mildew Inside Your home: How to Keep Air and Surfaces Healthier DIY Traditional Rocking Horse Johnson Brothers Trade Day 2018 DIY Mushrooms and Vege Kits: School Holidays Fun Winter 2018 for Curious Kids Woodworking Projects for Beginners: School Holidays Fun Winter 2018 - Simple Storage Box + Wood Tool Box Spring Garden Prep: Soil Care Spring into Spring + JBH August 2018 Trifecta DIY Backyard Doggie Paradise Garden Care for Heavy Rain Days + Non-Toxic Snail and Slug Debug Ideas Garden Design and Plant Management to Minimise Tick Attacks and Infestations - insights from an essay by Bill Conroy BSc. (Agr) (Syd) + a Tribute to Wilfred Lawrence Conroy CBE by Keith Jackson, PNG and others Make Your Own BBQ Kitchen Garden: Gifts That Grow Past That Giving Day Christmas Lights 2018: Light Up the Night How to Keep Your House Cool During a Heatwave Without Using an Air-Conditioner Mid-Summer Garden Care 2018 Winners Of National Hardware Store Of The Year - Johnson Bros Mitre 10 Mona Vale! + End Of Summer Garden To Do List DIY Fruits of Your Garden: Growing Figs Fruits Of Your Garden: Growing Passionfruit - Autumn Is Also The Time To Plant Strawberries For Spring How To Water Your Plants When Away On Holidays + Some April 2019 School Holidays Fun For Outdoors; A Skateboard Swing Or Indoors; Grow Or Make Pot Plant People Dealing With Autumn Dampness Inside The Home + Mums Day Gifts For 2019 Winter Heating Guide + Get Ready For Winter Specials Keeping Your Garden Dewful During Times Of Water Restrictions and Drought Installing Leaf Stopper Gutter Guard + Trade Day 2019 JBH Mitre 10 Trade Day Guests 2019 An Artfull Garden - for Winter School Holidays 2019 DIY Deck Refurbishment: Turning Wood Into Open Tiled Spaces - Groundworks Father's Day Wish List 2019 + How to Re-stain your Deck timbers and posts for Summer Installing Posts For Decks and Verandahs With Heavier Loads + Installing Membranes For Tiled Decks National Garden Week's 2019 Focus Is On Children(Oct 13-19): Spring School Holiday 2019 Garden Ideas (to get started on) Replacing Balustrades Handrails DIY Tiling Your Verandah: and Choosing Your Simple Or Complex Tile Pattern Reduce Bushfire Risk To Older Homes + Preparing Your Yard For Bushfires Time to Put Up those Christmas Lights and Deck your Gum Trees with rows of Jolly! NSW RFS Bushfire Survival Plan 2020 + Reduce Bushfire Risk To Homes + Johnson Brothers Mitre 10 Great Water Saving Ideas during Level 2 water restrictions + some 'Don't Sweat Summer' Specials The Inaugural Sydney Edible Garden Trail - Learn how to help your garden survive the heat, drought, and water restrictions DIY Flyscreens DIY Privacy Screen In 2 Hours Family Hardware Store Wins Best In Australia Autumn DIY Jobs: Exterior Jobs to Keep Everything Dry and Cosy Inside the Home Autumn Vegepod Garden: Plant Now to Stay Healthy: JBH Response to COVID-19 Restrictions - We're Adapting! Autumn Holidays Projects: Let's Go Fly A Kite + Some handy Painting Tips for Interiors and Sprucing up that Outside Deck - Easter Hours 2020 Pittwater's Noxious Weeds: A Great Time To Get Outdoors and Pull Them Out and Replace With Native Plants Blooming Lovely: Late Autumn Planting For Gardens Full Of Colour, Cheer + Great Food For The Table Dealing With Dampness Inside The Home - June 2020 DIY A Job For Life: Apprentice Carpenter + Commencement Tool List Winter School Holidays 2020: Easy To Do Garden Mosaic Pavers Little Hands Can Create + Home DIYer: Simple Concrete Slab DIY - A Job For Life: Landscape Gardener Apprenticeship DIY Fathers' Day ideas for 2020 + August Garden Jobs DIY Job for Life: Plumber's Apprenticeship Early Spring Garden Care Spring 2020 + Salad Garden For Children A Job For Life: Certificate III In Electrotechnology - From Apprentice To A Business Owner; Jay Turns Up The Voltage On His Career + Spring Garden Specials - seedlings time! Spring is here and wattles are out in bloom: a love letter to our iconic flowers Perfect Tomatoes, Capsicums and Spring Onions - Summer Salad Staples + what to plant now BBQ Season: some tips to keep your New or Old BBQ Clean Christmas Lights Time 2020: Deck Your Home With Rows Of Jolly! Johnson Brothers Avalon Store Renovations & Mona Vale Store: Everything You Need This Summer In Stock How To Keep Your Home Cool During A Heatwave Dealing With Dampness Inside The Home: The Wet Summer Of 2020/2021 +Nothing By Halves, Johnson Bros. Mitre 10, great new video By Community Requests Autumn/February 2021 re-run: Garden Design and Plant Management to Minimise Tick Attacks and Infestations The Bees Knees: what you can plant now to help your garden grow and help the bees Dealing with Storm Events: Flooding inside and around the home - how to Be Prepared Fun Project Ideas for Autumn School Holidays 10 Ways to keep your home warm and save money this Autumn and Winter Mother's Day 2021 Ideas: Grow Her Some Lemons Or Avocadoes Or Get A Pink Step Ladder So She Can Safely Reach The Top Shelf Indoors + JBH Celebrates Upgrade Of Avalon Beach Store These 3 Tips Will Help You Create A Thriving Pollinator-Friendly Garden This Winter 'Generation Restoration' Is The UN's World Environment Day 2021 Theme: How You Can Help Out At Home The Johnson Brothers Trade Day Is Back: Thursday June 17th + How To Build A Nesting Box For Our Local Possums and Birds Winter School Holidays 2021: Fun Projects You Can Do Around The Home - Something For The Young and Even Younger Winter DIY Ideas: Painting A Feature Wall + Outdoor Heating Options For Your Home + Declutter/Organise That Tool Shed Science Week 2021 Food Theme: A Salad Garden For Children Early Spring Chores For Great A Summer Outdoors: Clean and Reseal Your Wooden Deck Area Early Spring Chores For Great A Summer Outdoors: Soil Preparation For Vegetables + Salads + A Few Other Tips To Make Your Garden Ready To Plant Out
______________________
John and Bob Johnson - The Johnson Brothers Profile John William Alfred Johnson - The Eulogies for those who could not attend Mass
Australia's Prime Minister Visits Mackellar - Informal Afternoon Tea with Hon. Malcolm Turnbull October 2016
JBH Win Awards August 2018 Trifecta - 2018 Free Trade Day supporters, Mitre 10 Heritage Advert features JBH Mona Vale Store, Hardware Australia’s 2018 NSW Hardware Store of the Year over 2500sqm.
Front Page Issue 294: 2018 Winners Of National Hardware Store Of The Year - Johnson Bros Mitre 10 Mona Vale !!!
National Garden Week's 2019 Focus Is On Children(Oct 13-19): School Holiday Garden Ideas (to get started on) & Congratulations Award Winning Johnson Brothers Mitre10 At Mona Vale - 2019 NSW Store Of the Year, 2019 NSW Trade Centre Of the Year and 2019 Village Garden Centre of the Year
Johnson Bros Mitre 10 were awarded as the best Trade Store in the country: February 2020
Family Hardware Store Wins Best In Australia: Johnson Bros Mitre 10 Mona Vale Crowned ‘National Trade Store Of The Year’ - Celebrating 65th Year in 2020
Anzac Day In Pittwater 2020: Candles, Crosses and Online Commemorative Services: Johnson Brothers Family Donates 20 Thousand Candles to Community Light Up The Dawn Initiative
Front Page Issue 447: ANZAC DAY 2020
Front Page Issue 478: Johnson Brothers Avalon Store Renovations & Mona Vale Store: Everything You Need This Summer In Stock
Front Page Issue 492: JBH Celebrates Upgrade Of Avalon Beach Store