September 28 - October 4, 2014: Issue 182
Retaining Walls for Saving Soil and New Spring Garden Beds
Pittwater has a few hills and many of us have sloping gardens. Renewing terraces for garden beds, stopping your precious soil washing away or even styling a whole new look to your outdoor areas may inspire you to create a few little nooks that can then be planted out with native flora to attract birds and fauna residents, or a vegetable garden in time for Summer salads or even a shady arbor where your children can have a corner of fairyland right in their own home yards.
The first thing you need to be aware of is exempt and complying conditions in Pittwater. Before building any type of retaining wall it is best to check with your local Council as the areas in Pittwater are different and may require building approval or engineering certification.
Requirements for Exemption vary in Pittwater. For example in Warriewood:
On steeper slopes, preference is given to the use of stable rock ledges and escarpments to reduce the visual bulk of buildings. Where retaining walls and terracing are visible from a public place, preference is given to the use of sandstone or sandstone like materials. In the provision of outdoor entertaining areas, preference is given to timber decks rather than cut/fill, retaining walls and/or terracing. #
In general:
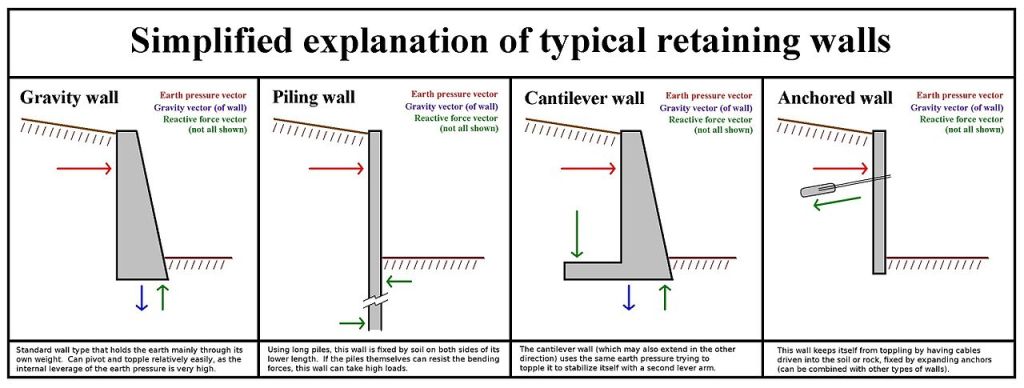
Retaining walls to be less than 600mm in height, at least 900mm from any boundary or structure, and with a maximum backfill of 5 cubic metres (no fill from outside the site). They must not prevent flow of stormwater/drainage runoff
Pittwater Council’s Advisory Notes on this are: Consult with a structural engineer to ensure stability. Masonry walls to comply with: AS 3700 - Masonry Code, AS 3600 - Concrete - Structures, AS 1170 - Loading Code - Timber walls to comply with: AS 1720 - -Timber structures, AS 1170 – Loading Code.
If you’re unsure, you can check on Council’s website, which is filled with what you need to know. These are the Exempt and Complying Development and Building and Construction Information pages
#P21 DCP Part D Page 183 *Pittwater Development Control Plan No 22: Exempt and Complying Development
Tools for the job: Mattock, Spade, Tape Measure, Circular Saw, Hammer, Square, Sledge Hammer, Angle Grinder, Wheel Barrow, Spirit Level, String Line, Marking Chalk
Materials: Sleepers/lumber, concrete, coarse gravel (ensure you purchase a product allowed), porous geotextile, nails/bolts.
There are a number of different options you can choose and that can be built by a confident DIYer including timber, logs and sleepers. Something that is going to suit your landscape is going to retain what Pittwater is about, so if you have a lot of old bush stone on your property, using this will look great as well as make it look as though your wall has always been there.
Step One
The first thing you need to do is decide where you're going to build the wall and how long it will be, this will help you finesse the lengths of timber you want to get. The method used here is to do a visual layout: run a string line between two stakes as a guide for building your retaining wall. Also examine the soil - some clay soils will require a bit more work and when reusing as fill, you may want to use all the green refuse in your compost bin contents to change the clay closer to soil.
Step Two
If you’re going to build a wood retaining wall you need to choose your timber. Rectangular hardwood sleepers, or round logs are a great economical choice for low load applications like garden beds. They are natural, low cost and low maintenance. Timber must be treated to at least hazard level H4 to protect it from funghi or wood munching insects.
Step Three
After using a string line to mark out where you are going to build your wall, mark your post spacing according to timber length. Posts should be spaced at 1.2m intervals apart if your sleepers are 2.4m long, or 1.5 metres apart if you use 3 metre sleepers.
Step Four
Dig your post holes 700mm deep x 300mm wide. Fill the bottom 100mm of each hole with coarse gravel for drainage.
Step Five
Cut your posts to length (1200mm for a 600mm high wall). The tops of your posts should be cut with a slight slope to shed water. Seal all cut ends with an appropriate timber preservative, including the base of your posts.
Step Six
Place the end posts in the holes and fill with concrete to ground level. Leave concrete to set according to the manufacturers instructions. A handy tip to remember is to lean the posts about 5 degrees towards the bank if you are installing a retaining wall on a slope. Once the fill is placed, this will help the wall take the strain.
Step Seven
Tie a string between these posts and use that to align the other posts. Then place your first horizontal timber and mark where the upright posts are. Remove, and drill a slightly undersized hole in the horizontal timber where it meets the upright. Once the horizontal timbers are in place, you’ll be able to secure them with a galvanised spike or nail into the upright post. Replace your horizontal timber behind the posts. Check to make sure the timber is level.
Step Eight
Stack your additional logs or sleepers on top to reach the desired height of 600 mm, securing with nails/bolts as you proceed. Remember that your Sleepers must be placed behind posts.
Step Nine
Behind the second layer of timber, lay slotted agricultural pipe for drainage. Surround this pipe with course gravel. To prevent excess soil loss through the timber, line the inside of the wall with a porous geotextile. This is a permeable fabric used to filter seepage prior to drainage and helps reduce soil erosion from your garden. If you use plastic sheeting this could cause water build up and your wall to collapse. Install a spoon drain at the high side to help with run off.
Step Ten
Compacting your fill is vital if you don't want to create a 'dip'. Professionals recommend that the best results will come from filling in 200mm and then compacting and repeating this process until you have reached your 600mm. Rollers and compactors can be hired for this part of finishing your retaining wall.
Now you are ready to create a garden in this new space!
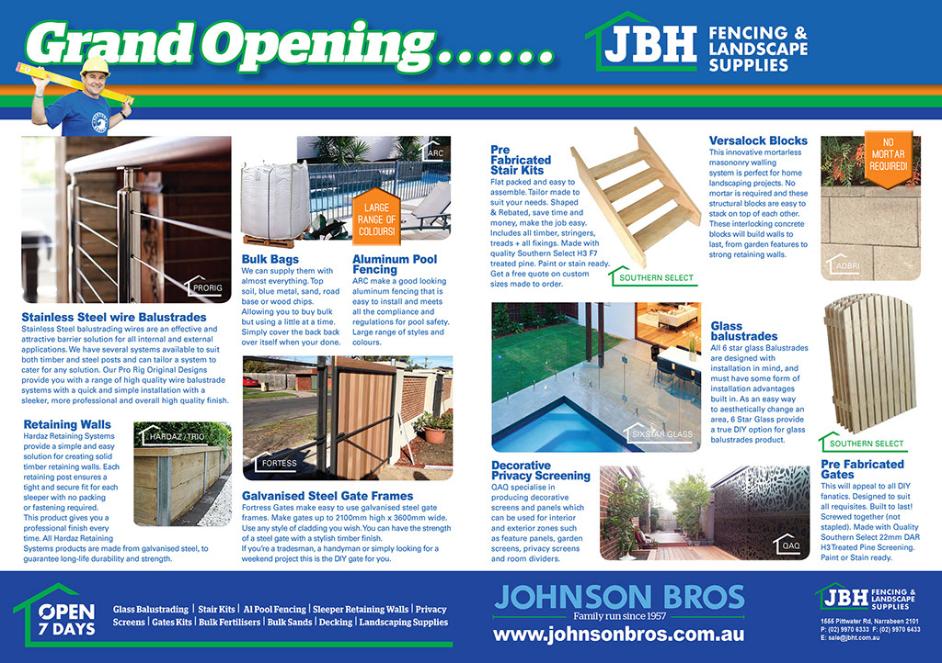
This DIY Spring Garden project will take about two days to complete when taking into account allowing the cement to set properly. If you want supplies and product advice we suggest you visit the Johnson Brothers Hardware Fencing and Landscape Supplies yard just past the turn off to Warriewood shopping centre as you’re heading to Narrabeen. The range of options and colours to suit your tastes and extend those green hills and blue skies into your own yard a little further may even inspire you to more DIY Spring Garden revamps. And while on Doing It Yourself - JBH Mitre 10 are bringing more inspiration your way in a few weeks:
.jpg?timestamp=1411833892317)


Products advice is available from the trained friendly staff at Mona Vale and Avalon Johnson Brothers Mitre 10.

Previous DIY Pages:
Decking Timbers Caring For Your Deck Decking Finishes Privacy Screens I Privacy Screens II Privacy Screening Hardwoods Autumn Paths and Lawns Insulation Batts Plasterboard Ventilation - Edmond's Ecofan Blackboards for Children and Home Spring Lawn Care Shade Sails & Watering Basic DIY Tools DIY Tools - Power Drills Recycle Your Trampoline into An Air Bed How to Build Your Own Backyard Cricket Pitch Christmas Lights Displays around House and Garden Summer Mildew - Refresh, Renew How to Fix Things That Drip and Bump in the Night Time To Plant Winter Vegetables – Raised Garden Beds Layout Orgainsing Your Tool Shed Make Your Own Weathervane Installing A Garden Watering System Decking Oils How To Make Garden Compost How To Winter proof Your Lawn How to create Shabby Chic effect on Timber Furniture How to Build Your Own Raised Garden Bed Growing Your Own Winter Vegetables Winter Heating Guide Prepare Your Yard For Winter Eradicating Noxious Weeds From Your Yard How to Fix Furniture Finishes Part I How to Repair Scratches, Dings, and Dents of Furniture Surfaces - Part II Winter Draughts Fix Classic Wooden Tool Carrier Spring Garden Checklist Part I Install Your Own Skylight
Copyright JBH Mitre 10, 2014. All Rights Reserved .