November 16 - 22, 2014: Issue 189
Renewing Short Flight of Stairs – Straight Stairs
Harsh Australian sun, followed by downpours, for years, gradually deteriorates outside stair courses and these will need replacing. Using products suitable and recommended for exterior stairs, such as treated pine and hardwoods, will ensure you don’t need to do this too often, however, every ten to fifteen years, for safety, aesthetics and as one of those maintenance works we all do, rebuilding a short course of stairs is required.
We spent close to $350.00 all up on timber, fittings, screws required and if you add in another $50-100.00 for treating the stairs with protective products afterwards (which should be reapplied every year or so if using a stain such as Sickens), batten screws you can save a fair amount by doing it for yourself and have the satisfaction of seeing something you built being of use for a long time.
This is a very simple method to replace a short four tread set of exterior steps – but, as with all DIY projects, the advice of professionals, to measure three times, cut once, will save you having to do it again. If this looks too complicated remember that Johnson Brothers fencing and landscape supplies at Narrabeen stock prefabricated stair kits where most of the work is already done for you.
The most common type of stair construction is house treads into stringers. Flights may be constructed with ‘open treads' without risers or ‘closed treads' with riser boards. Open tread stairs are recommended for external use because they give better air circulations allowing exposed timber to dry more quickly, thus improving durability. Metal angle brackets may be used as an alternative to housing in the treads.
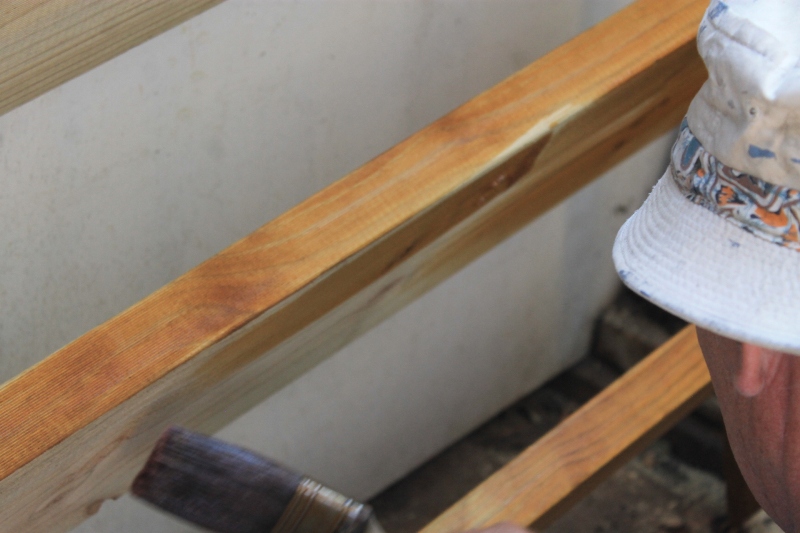
The one we built was this simple treads into stringers open version. A tread is a term for the actual step. The Stringer is the boards on either sides of the treads into which, in this version, they are slotted (For safety, Australian building guidelines state each tread has to be 250mm or wider):
Straight stairs comprise a single flight of stairs with parallel treads. This form of stair has no landing. A ledger/anchor board is recommended for attaching the flight of stairs to any wall the stairs bridge although there are alternative methods of securing steps so they do not shift when used.
Tools:
• string line (a long piece of string on a stick)
• chisel or hand router
• tape measure
• electric saw or regular hand saw
• hammer
• carpenters pencil
• carpenters square
• spirit level
Materials:
Rougher HEADED H3 CCA T/P 240X45 - 7.8 LM
Nails and screws - galvanised
Timber stain – your choice, we used Sikkens
Builders Tips:
Make sure you have the correct materials for the job to prevent things like premature corrosion, wood rot and termite damage.
1. Do not use standard treated pine for decking on the southern side of your home as it will be prone to wood rot.
2. Ensure that your deck is built using galvanised or stainless steel connectors such as nails. Un-galvanised nails react with many external timbers causing them to rust. Stainless steel connectors are only used for builds in highly corrosive locations like beach front and industrial locations.
3. Treat/stain all edges of woods used prior to installing your completed steps.
Step One - Measure Height and Passage Width
The first step in designing a set of stairs using stringers is to determine the overall height a flight must extend to. The height cannot be measured directly down from the deck at the stair location if the ground is uneven, instead measure from the location where the stairs will land vertically to the height of the next level.
The maximum rise between adjacent treads in mainstream building codes is 7 3/4". Divide the overall height by this value and round up. This will yield the minimum amount of treads required for the stairway. Subtracting “one” from this value provides the number of treads (assuming the first tread is a step down from the base/ground). Once the number of treads is determined, the exact location the stairs will land can be discovered. Multiply the number of treads by their depth (minimum 10 inches) and measure out from the upper level to where the stairs will land.
Once the height and tread depth is determined, and you have decided on the width of the flight of stairs, you can begin building. Remember you can adjust angel and width of treads to suit needs - lower and wider for elderly people is a good idea. The Australian Building Code and local Council requirements should always be adhered too as well - these offer best practice.
Step Two - Cut Stringers
Modify the top of the stringer to account for the overall angle. This angle will depend on the size of your steps. Be sure to account for any modifications (ex. added length when mounting beneath an overhang) if necessary. Place the carpenter’s square over one corner of the lumber. Lay the side marking the height along the end of the lumber and the side marking the step depth along the length of the lumber.
Draw a line across the lumber from the step-height to the step-depth mark on the square. This line marks the horizontal top of your stringer. Mark the line so that its length is equivalent to the depth of one stair. Start from the end of the existing line that is closest to the center of the board, measure outward, and mark the spot.
Use the square to draw a line perpendicular to the spot you just marked. This line marks where your stringer will sit flush with whatever you’re attaching the staircase to. Cut along these lines. The top end of the stringer will now fit to the attachments at the appropriate angle.
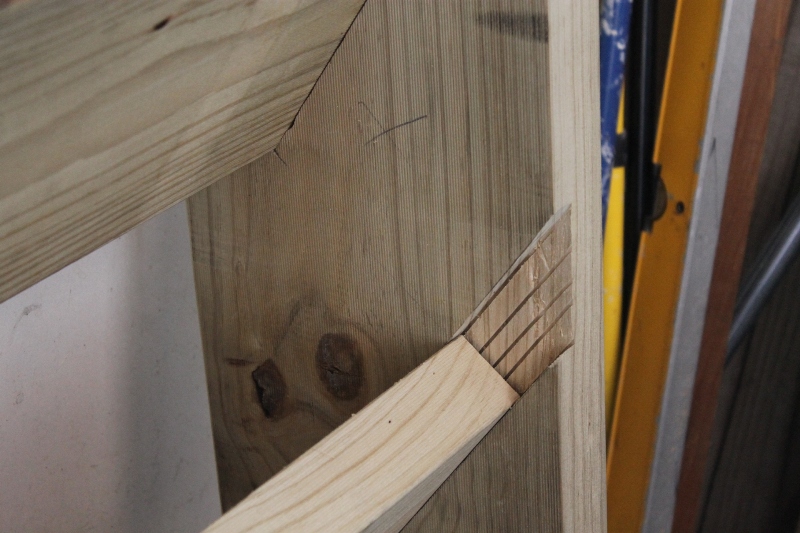
Step Three - Cut Mortises into Stringers
 Cut mortises in the sides of the stringers to accommodate the treads. Mark on inside of stringer the four steps at equal lengths. Next, cut a slot deep enough to accommodate the depth of the treads. The slot’s width should equal the thickness of the treads.
Cut all the treads to equal lengths. Set one end of the first tread in the first mortise of one stringer. Bring the other stringer to it, and set the tread in its first mortise. Continue from one end to the other, getting all the treads started in their mortises. Pipe clamps can come in handy at this point for drawing the opposing stringers toward one another. The fit should not be so snug that you have to pound things together, and not be so loose that the assembly will rack.
You can nail the stringers to the treads, but we used screws and then placed a seal over these slight indentations for extra wear and tear. They offer a little insurance against the stringers’ warping and pulling the nails out of the end grain. For outdoor stairs outdoors, be sure the screws are corrosion resistant.
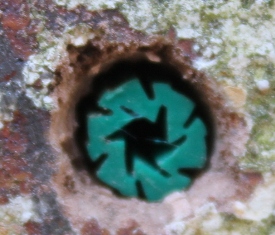
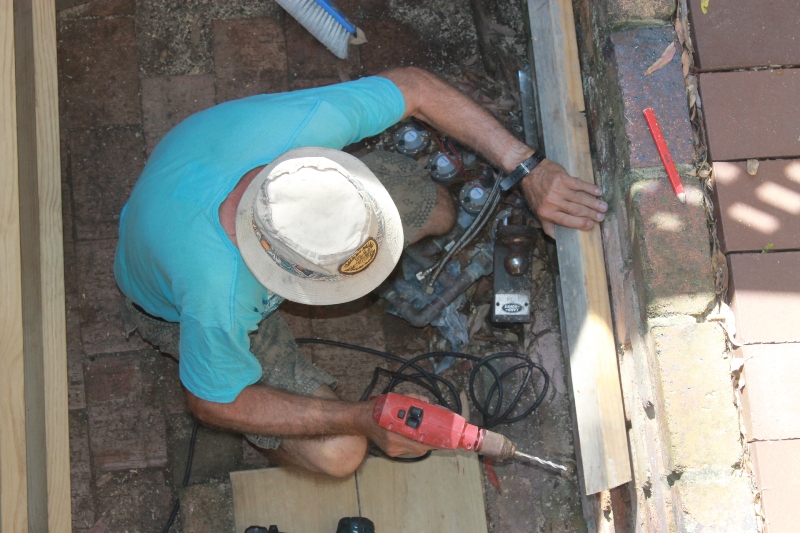
Step Four - Attach an Anchor Board
This too should be of hardwood - ensure you paint it with a couple of coats of a hard-wearing paint suitable for exterior wear and tear. If you are attaching this to a surface such as brick as we did an added 'stay put' measure is to use a wall anchor/screw holder (as above) - drill the hole for your ss screw/bolt - insert anchor - place Anchor Board - check it is level with your spirit level - drill into place.
Step Five - Attach Short flight of stairs
Make sure you attach with strong corrosion resistant screws - cheaper products will rust and rot your wood.
Step Six - Apply at least two coats of an Exterior Stain
Best method here to ensure your new steps last the same 15 years is to apply 2-3 coats - allowing at least 12 hours between applications. To save your back - paint the first coat of undersides of steps prior to attaching to anchor/ board.
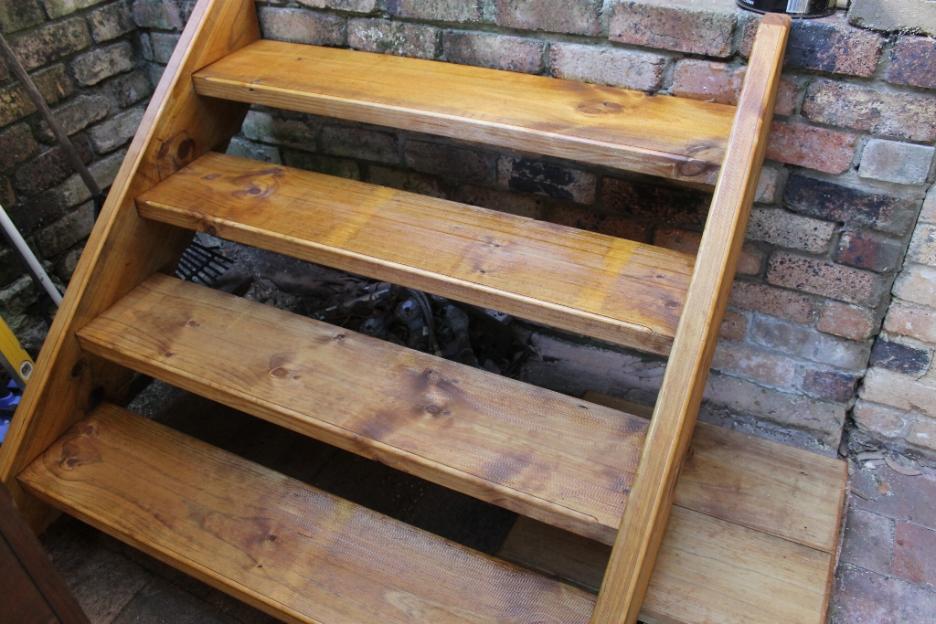
Our finished flight of four steps - good for another 15 years!

Products advice is available from the trained friendly staff at Mona Vale and Avalon Johnson Brothers Mitre 10.

Previous DIY Pages:
Decking Timbers Caring For Your Deck Decking Finishes Privacy Screens I Privacy Screens II Privacy Screening Hardwoods Autumn Paths and Lawns Insulation Batts Plasterboard Ventilation - Edmond's Ecofan Blackboards for Children and Home Spring Lawn Care Shade Sails & Watering Basic DIY Tools DIY Tools - Power Drills Recycle Your Trampoline into An Air Bed How to Build Your Own Backyard Cricket Pitch Christmas Lights Displays around House and Garden Summer Mildew - Refresh, Renew How to Fix Things That Drip and Bump in the Night Time To Plant Winter Vegetables – Raised Garden Beds Layout Orgainsing Your Tool Shed Make Your Own Weathervane Installing A Garden Watering System Decking Oils How To Make Garden Compost How To Winter proof Your Lawn How to create Shabby Chic effect on Timber Furniture How to Build Your Own Raised Garden Bed Growing Your Own Winter Vegetables Winter Heating Guide Prepare Your Yard For Winter Eradicating Noxious Weeds From Your Yard How to Fix Furniture Finishes Part I How to Repair Scratches, Dings, and Dents of Furniture Surfaces - Part II Winter Draughts Fix Classic Wooden Tool Carrier Spring Garden Checklist Part I Install Your Own Skylight Retaining Walls for Saving Soil and New Spring Garden Beds November 16 - 22, 2014: Issue 189
Renewing Short Flight of Stairs – Straight Stairs
Harsh Australian sun, followed by downpours, for years, gradually deteriorates outside stair courses and these will need replacing. Using products suitable and recommended for exterior stairs, such as treated pine and hardwoods, will ensure you don’t need to do this too often, however, every ten to fifteen years, for safety, aesthetics and as one of those maintenance works we all do, rebuilding a short course of stairs is required.
We spent close to $350.00 all up on timber, fittings, screws required and if you add in another $50-100.00 for treating the stairs with protective products afterwards (which should be reapplied every year or so if using a stain such as Sickens), batten screws you can save a fair amount by doing it for yourself and have the satisfaction of seeing something you built being of use for a long time.
This is a very simple method to replace a short four tread set of exterior steps – but, as with all DIY projects, the advice of professionals, to measure three times, cut once, will save you having to do it again. If this looks too complicated remember that Johnson Brothers fencing and landscape supplies at Narrabeen stock prefabricated stair kits where most of the work is already done for you.
The most common type of stair construction is house treads into stringers. Flights may be constructed with ‘open treads' without risers or ‘closed treads' with riser boards. Open tread stairs are recommended for external use because they give better air circulations allowing exposed timber to dry more quickly, thus improving durability. Metal angle brackets may be used as an alternative to housing in the treads.
The one we built was this simple treads into stringers open version. A tread is a term for the actual step. The Stringer is the boards on either sides of the treads into which, in this version, they are slotted (For safety, Australian building guidelines state each tread has to be 250mm or wider):
Straight stairs comprise a single flight of stairs with parallel treads. This form of stair has no landing. A ledger/anchor board is recommended for attaching the flight of stairs to any wall the stairs bridge although there are alternative methods of securing steps so they do not shift when used.
Tools:
• string line (a long piece of string on a stick)
• chisel or hand router
• tape measure
• electric saw or regular hand saw
• hammer
• carpenters pencil
• carpenters square
• spirit level
Materials:
Rougher HEADED H3 CCA T/P 240X45 - 7.8 LM
Nails and screws - galvanised
Timber stain – your choice, we used Sikkens
Builders Tips:
Make sure you have the correct materials for the job to prevent things like premature corrosion, wood rot and termite damage.
1. Do not use standard treated pine for decking on the southern side of your home as it will be prone to wood rot.
2. Ensure that your deck is built using galvanised or stainless steel connectors such as nails. Un-galvanised nails react with many external timbers causing them to rust. Stainless steel connectors are only used for builds in highly corrosive locations like beach front and industrial locations.
3. Treat/stain all edges of woods used prior to installing your completed steps.
Step One - Measure Height and Passage Width
The first step in designing a set of stairs using stringers is to determine the overall height a flight must extend to. The height cannot be measured directly down from the deck at the stair location if the ground is uneven, instead measure from the location where the stairs will land vertically to the height of the next level.
The maximum rise between adjacent treads in mainstream building codes is 7 3/4". Divide the overall height by this value and round up. This will yield the minimum amount of treads required for the stairway. Subtracting “one” from this value provides the number of treads (assuming the first tread is a step down from the base/ground). Once the number of treads is determined, the exact location the stairs will land can be discovered. Multiply the number of treads by their depth (minimum 10 inches) and measure out from the upper level to where the stairs will land.
Once the height and tread depth is determined, and you have decided on the width of the flight of stairs, you can begin building. Remember you can adjust angel and width of treads to suit needs - lower and wider for elderly people is a good idea. The Australian Building Code and local Council requirements should always be adhered too as well - these offer best practice.
Step Two - Cut Stringers
Modify the top of the stringer to account for the overall angle. This angle will depend on the size of your steps. Be sure to account for any modifications (ex. added length when mounting beneath an overhang) if necessary. Place the carpenter’s square over one corner of the lumber. Lay the side marking the height along the end of the lumber and the side marking the step depth along the length of the lumber.
Draw a line across the lumber from the step-height to the step-depth mark on the square. This line marks the horizontal top of your stringer. Mark the line so that its length is equivalent to the depth of one stair. Start from the end of the existing line that is closest to the center of the board, measure outward, and mark the spot.
Use the square to draw a line perpendicular to the spot you just marked. This line marks where your stringer will sit flush with whatever you’re attaching the staircase to. Cut along these lines. The top end of the stringer will now fit to the attachments at the appropriate angle.
Step Three - Cut Mortises into Stringers
Cut mortises in the sides of the stringers to accommodate the treads. Mark on inside of stringer the four steps at equal lengths. Next, cut a slot deep enough to accommodate the depth of the treads. The slot’s width should equal the thickness of the treads.
Cut all the treads to equal lengths. Set one end of the first tread in the first mortise of one stringer. Bring the other stringer to it, and set the tread in its first mortise. Continue from one end to the other, getting all the treads started in their mortises. Pipe clamps can come in handy at this point for drawing the opposing stringers toward one another. The fit should not be so snug that you have to pound things together, and not be so loose that the assembly will rack.
You can nail the stringers to the treads, but we used screws and then placed a seal over these slight indentations for extra wear and tear. They offer a little insurance against the stringers’ warping and pulling the nails out of the end grain. For outdoor stairs outdoors, be sure the screws are corrosion resistant.
Step Four - Attach an Anchor Board
This too should be of hardwood - ensure you paint it with a couple of coats of a hard-wearing paint suitable for exterior wear and tear. If you are attaching this to a surface such as brick as we did an added 'stay put' measure is to use a wall anchor/screw holder (as above) - drill the hole for your ss screw/bolt - insert anchor - place Anchor Board - check it is level with your spirit level - drill into place.
Step Five - Attach Short flight of stairs
Make sure you attach with strong corrosion resistant screws - cheaper products will rust and rot your wood.
Step Six - Apply at least two coats of an Exterior Stain
Best method here to ensure your new steps last the same 15 years is to apply 2-3 coats - allowing at least 12 hours between applications. To save your back - paint the first coat of undersides of steps prior to attaching to anchor/ board.
Our finished flight of four steps - good for another 15 years!
Products advice is available from the trained friendly staff at Mona Vale and Avalon Johnson Brothers Mitre 10.
Previous DIY Pages:
Decking Timbers Caring For Your Deck Decking Finishes Privacy Screens I Privacy Screens II Privacy Screening Hardwoods Autumn Paths and Lawns Insulation Batts Plasterboard Ventilation - Edmond's Ecofan Blackboards for Children and Home Spring Lawn Care Shade Sails & Watering Basic DIY Tools DIY Tools - Power Drills Recycle Your Trampoline into An Air Bed How to Build Your Own Backyard Cricket Pitch Christmas Lights Displays around House and Garden Summer Mildew - Refresh, Renew How to Fix Things That Drip and Bump in the Night Time To Plant Winter Vegetables – Raised Garden Beds Layout Orgainsing Your Tool Shed Make Your Own Weathervane Installing A Garden Watering System Decking Oils How To Make Garden Compost How To Winter proof Your Lawn How to create Shabby Chic effect on Timber Furniture How to Build Your Own Raised Garden Bed Growing Your Own Winter Vegetables Winter Heating Guide Prepare Your Yard For Winter Eradicating Noxious Weeds From Your Yard How to Fix Furniture Finishes Part I How to Repair Scratches, Dings, and Dents of Furniture Surfaces - Part II Winter Draughts Fix Classic Wooden Tool Carrier Spring Garden Checklist Part I Install Your Own Skylight Retaining Walls for Saving Soil and New Spring Garden Beds
Copyright JBH Mitre 10, 2014. All Rights Reserved .