Keeping Cool Over Summer - Creating an Outdoor Dining Arbour, Gazebo or Patio
February has produced some warm and humid days. To keep cool and among the sea breezes this Issue we look at how to create your own arbour.
What could be better then having a meal outside, in the shade, or even in the rain? If you have an awning, shade cloth, add a few privacy screens to make it look like a welcoming outdoor room, this are can be utilised year round – not just when it’s too hot to eat indoors.
This is a project that will take time so we split it into two stages, completed over two weekends:
A. Building a paved patio area
B. Creating an Outdoor Nook
Building a paved patio area
Building a paved patio area is fairly easy. It's a big project though, with four basic steps:
1. Plan the size; allow the area to have generous edges around where you will install your awning so you can place potted plants to create a nice ‘arbour’ feel.
2. Digging a hole about 10 in./ 25.4 centimetresdeep, and pack a 6-in./15.24 centimetres layer of gravel or sand to form a flat base that slopes slightly for drainage.
3. Set the pavers in a layer of sand and tamp them down so the surface is even.
4. Fill the cracks with sand and tamping again, and installing a border to keep it in place.
 The cost will vary depending on your choice of pavers. When choosing these think about if you want to create a pattern or something simpler and where it will be on your property – for instance, a light coloured paver under gum trees will become stained and require cleaning.
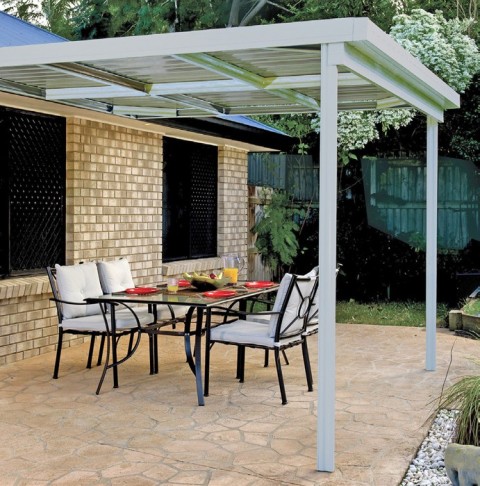
Right: Absco Awning $499.00: • 3(H) x 3(W) x 3(D)m. • Zincalume BlueScope steel construction. • Wind rating of W50 (C2). • Easy to assemble. • Can be attached to timber, metal or brick work. • Includes frame, roof sheet, gutters, downpipes and posts. • 30 year warranty.• Also available - 3(H) x 6(W) x 3(D)m. • Zincalume $799
The quantity of the materials needed for the paving job depends upon the total area to be paved. This area is simply calculated by measuring the width and length of the area to be paved. Pittwater Council exemptions for outdoor awnings are 10 square metres in Regions; 2, 3 and 5: and in region 4: Maximum area 20 sq m per awning.
10 square metres equates to an area 2 metres wide and 5 metres long.
As you will want an area of pavers around any awning, gazebo or arbour you build or install, the rule is measure three times. You also want to consider the seasons – are you wanting a sunny nook for cool winter days as well? Watch how the sun moves across your yard
Pavers – how many?
Calculate the square metreage to be covered and add 5% to allow for cuts and wastage – at least 100mm for areas a car may pass over and 50mm for foot traffic.
Bedding Sand – how much?
30mm of bedding sand (washed concrete sand) is required under all paving. 1 tonne will cover approximately 15 square meters.
Jointing Sand
Jointing sand is used to fill the gaps between the paving units once laid. A 40kg bag will cover approximately 15 square meters of paving depending upon the size of joint spaces
Dry Cement
If you need help working out what amounts of each of these you will require for your area, simply ask the Johnson Brothers trained staff for help – they can provide quotes on products. Simply provide them with your square metre ratio or visit their Narrabeen yard where sand, metal and pavers are available.
Framework Boards – use treated pine or hardwoods if leaving in place.
 Installing timber formwork for the area you’re planning to pave will make the perimeter sharper and your work easier. If you are planning on leaving this formwork in place make sure you purchase a timber that will last in outdoor conditions – treated pine for example.
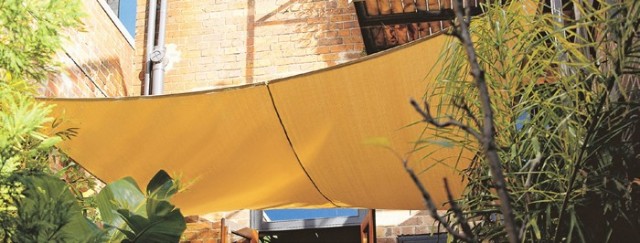
Right: Coolaroo Square Shade Sail $59.00: • 3.6m. • Up to 90% UV block. • Available in Beige or Grey.
You will also need a screed when laying the sand level; these can be easily made by cutting a notch out of each end of a board so it fits snugly within the framework
Tools you will need: Trowel, String line, Level, Spade, Rake, Rubber mallet, Tape Measure, Hammer, Angle Grinder, Safety glasses, Line level. Optional: Compactor. Brick saw
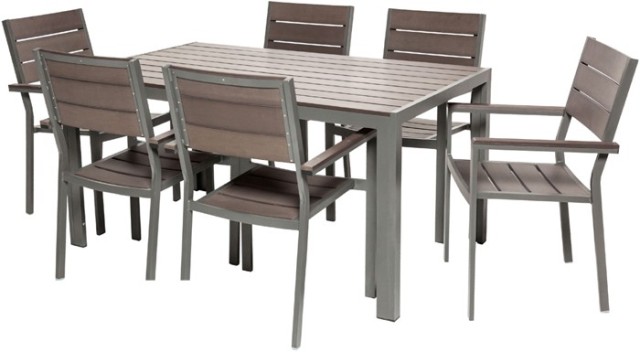 Right: Apsley 7pce Aluminium Setting - $699.00: • Includes 6 chairs and 72(H) x 150(W) x 90(D)cm table. • Polywood table top and chairs. • Includes charcoal seat cushions (not shown). • Also available 9pce $899
Step One - Mark out your area and prepare it
Measure your area so the 2 x 2 sides are parallel and then run a string line between the stakes at the level you want the paving to be. Check the level of the string using a string line level or spirit level. Adjust the string to allow a small slope for water run-off; remembering to slope away from the house if your pavers are afgaints exterior walls. Most builders use a sloped 12mm for every 3m.
Remove the topsoil to a depth that will accommodate a bed of sand plus the thickness of the pavers you've chosen. Ensure the ground is firm and level. Any areas that may sink should be dug out and filled with gravel and then well compacted. Hiring a compactor to ensure your base is compacted properly is a good idea, especially if you are paving a driveway area.
Fit your timber formwork around the perimeter, driving in stakes in behind the boards. The tops of the boards should be level to act as a guide for levelling the surface, so check this before proceeding.
Step Two – Lay and level your sand
Spread an even surface of sand at 25mm thick for foot traffic. Smooth the sand until level by screeding, running a screed board over the sand along the formwork edges.
Step Three – Laying your Pavers
 If you are going to create a pattern with your pavers start from one corner, same again if you’re simply setting square paver by square paver. Set them so you are allowing a 2mm to 4mm gap between each – this you will fill with a mix of 4 parts clean dry sand and 1 part dry cement once all are placed.
After laying a square metre, tamp these level with a piece of wood wide enough to cover a few and taps from the rubber mallet – check with your level before proceeding.
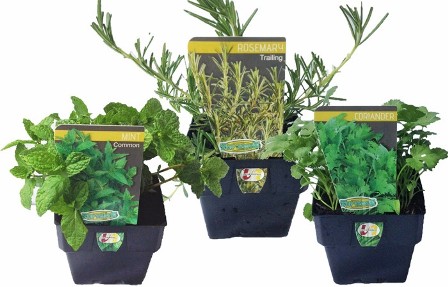
Right: Assorted Herb Collection - $3.00 each • 100mm pot. • Herbs are the flavour of the month. • Assortment of the most popular culinary varieties.
If you are making a pattern you will have edges that require cutting the pavers to make these fit. Pavers made from different materials are best cut in different ways. For an amateur, using a chisel and hammer is the best and easiest way on soft stone such as sandstone. Score a paver along the desired cut line by placing the chisel's blade vertically along the line and tapping the chisel's other end sharply with the hammer. Scoring the paver's sides and back along the same line is necessary. Several taps along the score line will split the paver.
Cutting pressed concrete, wet cast concrete and clay pavers requires a power saw. Concrete block pavers and natural stone also can be cut with a power saw but will produce a great deal of dust. You can hire a wet-cut saw, and these come with stands. Angle grinders can also be used but if you are going to install a large area, with a pattern that will require multiple cut pavers, hiring a wet-cut saw will make sense. This is why asking about the products you want to use and visualising what you want to install before beginning is a good idea.
Step Four – Filling the cracks and Bordering
Once all your pavers are placed and tamped, spread your mix of sand and cement, sweeping over the area, until all cracks are filled. It is a good idea to tamp once more at this stage to ensure everything is level. Add more of your sand/cement mix in places required. Brush off the excess and then spray lightly with water – not too much or you will fill the sand/cement mix to the point where it flows out from between the pavers.
To keep everything in place either leave your wooden formwork in place, upend some pavers and use these as a border, or put concrete where the formwork is.
________________________________________________
Now you’re ready for the next stage – building or installing that shelter from sun or storm. Some of the products featured in this page are those from the current Johnson Brothers Mitre 10 Catalogue: shop.mitre10.com.au/catalogue
These remain on sale until February 22nd and may help with your plans and inspirations. We will run some ideas for Creating an Outdoor Nook as Part II of this Keeping Cool Over Summer DIY idea.
Featuring easy to follow, step by step assembly instructions, Absco Patio Covers are a great addition to your home to be used an outdoor entertaining area. The Patio Covers have a 30 year written warranty and have a wind rating of up to 180km/hr W50. The patio cover has an optional extra available in the Skylight Panel which replaces one of the roof sheet to allow extra light.
________________________________________________
Pittwater Council – Exempt and Complying Constructions
Awnings, canopies and sun or storm blinds on dwellings (a roof-like shelter of canvas, metal, timber or the like, located over a window or door for weather protection)
Maximum area 10 sq m per awning (an area 2 metres wide by 5 metres long would be 10 square metres- Ed.) Not to extend within 900mm of side or rear boundary in zones other than Non-Urban, or compliance with s3 cl 3.7 of the BCA Housing Provisions In residential zones not to extend within 10m of a main road; 6.5m of a secondary road; not to breach any de facto building line to adjoining dwellings In non-urban zones not to extend within 30m to a main road; or 20m to all secondary roads and public reserves Not to extend within 7.5m of side or rear boundary in 1(a) and 1(b) zones Not to extend within 6.5m of side or rear boundary in 1(c) zone Constructed of non-combustible materials if located in a bushfire area Does not preclude landscaping or tree growth Meets Requirements on page 13 & 14
Installed to manufacturer’s specifications; walls not included – supporting posts permitted Comply where appropriate with Australian Standard AS 3959 – 1991 Construction of Buildings in Bushfire Prone Areas. Standards Australia handbook HB 36 – 1993 Building in Bushfire Prone Areas. Ministerial Direction G20 Planning in Bushfire Prone Areas under Section 117 (2) of the Environmental Planning and Assessment Act.
Exempt in Region; 2, 3 and 5: Exempt in region 4: Maximum area 20 sq m per awning Located wholly on property Does not preclude landscaping or tree growth
Minor outbuildings, cabanas, gazebos, greenhouses, hobby sheds, garden sheds, and the like in Zones other than Non Urban
Maximum area 10 sq m Maximum height 3m Minimum for residential areas: • Max total site coverage including the new works: 40% • Min landscaped area: 60% • Rear and side boundary setback: one third of the wall height, minimum 1m, and does not breach any de facto building line • Max length of wall (within 3m of boundary): one third of boundary length • Darker, non-reflective wall and roof materials to match or complement existing dwelling • No additional shadowing of adjoining property.
Must be structurally adequate, installed to manufacturer’s specifications Comply where appropriate with Australian Standard AS 3959 – 1991 Construction of Buildings in Bushfire Prone Areas. Standards Australia handbook HB 36 – 1993 Building in Bushfire Prone Areas. Ministerial Direction G20 Planning in Bushfire Prone Areas under Section 117 (2) of the Environmental Planning and Assessment Act.
See all at: http://www.pittwater.nsw.gov.au/__data/assets/pdf_file/0004/6844/dcp22.pdf