DIY Gazebo or Pergola – Al fresco Eating in Your Own Yard
- Part II
In Part I of this two part project building a paved patio area laid the groundwork for creating an al fresco dining area or little nook in your garden for a pergola or a gazebo.
A pergola as described by Encyclopaedia Britannica, adds sophistication, style, elegance and class to any garden or backyard. In doing so they can increase the value of your property too without too much effort.
When thinking of where you will place your new garden area, and since it is to take advantage of being in the great outdoors, think about the seasons you will want to use it in, Summer through Winter, and how the sun moves across your yard. In Summer you may not want too much direct sunlight into this area while in Winter you’ll want every spot of warmth that comes. This will help you decide where you want to place the roof sheets of either the pergola or Gazebo (you can but these in kits too now).
As we showed in Part 1, Johnson Brothers Mitre 10 stock some great Kit Awnings that are fairly easy to put together yourself. These are a great option as they’re maintenance free, built to last and strong while the steel used, aluminium, won’t rust in our salt air environment. Just ensure that you follow the manufacturer’s instructions and Pittwater Council’s Exempt and Complying Constructions codes. If you're not a confident DIYer, these are the option that will be best for you.
 Constructing your own pergola is fairly easy too though. You will need posts, cement to secure these in once you have dug a hole, trusses for your roof and roofing – if you choose this option and to use timber, make sure you choose woods that will last in the Australian outdoors, treated pine and hardwoods will work best and last longest. Your measurements, as per Exempt construction, will be: Maximum area 10 sq m per awning (an area 2 metres wide by 5 metres long) and up to 3m in height in most areas of Pittwater. The Mona Vale Johnson Brothers Mitre 10 stock every timber you need and their trained staff can advise on what will work best for what you want your pergola to look like.
To Build a Pergola Yourself
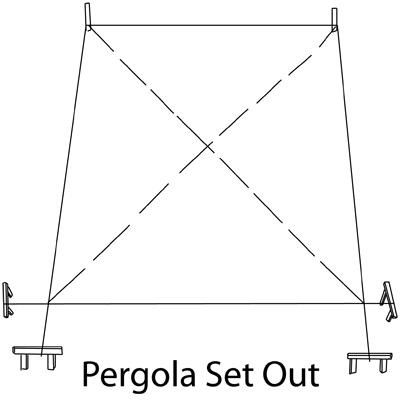
1. Measure out your dimensions – 2 x 5 m. decide if you are building a traditional pergola, where framing for roof with sit inside the edge and roff sheeting will be flat atop cross beams or whether you will be requiring trusses for a pitched roof. Australian Building Codes will need to be met if you choose these options. Mark your dimensions by hammering in a short stick and running a length of string between them. Check your measurements again and ensure they are straight y checking along the sting.
2. Dig post holes that will match your posts 45x45 to 45cm depth for a concrete pad to be poured for 4 x post brackets.
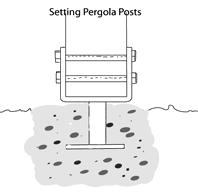 3. Follow the directions on the concrete packet, allow for a generous amount for each post hole. Once you are pouring concrete into prepared holes, set post bracket in the middle of the pad and allow a 75mm clearance between the ground and the bottom of the post. This will stop your timber sitting in any rain that may sit on your paved area and cause the post bases to rot. Also check that these brackets are straight (vertical) prior to concrete setting. Use a spirit level for this.
4. Once the concrete has ‘gone off’, measure your posts once more to check they comply to the 3m height if this is your desired height, and cut if needed. Install your posts in their brackets and check all are level.
5. Determine if homemade trusses are suitable for the project you're building. Since your truss will support the roof of your building, it should not violate local building codes and must be designed to meet wind load and other structural requirements. A flat roofed pergola is simpler and easier.
6. Install your rafters – these are the two 5m lengths.
7. Install your battens – when building a flat roofed pergola these are the lengths of wood that will go crossways- place the two at either end first then one in the middle to add strength; nail the battens into place first using a nail gun if you have one to position the battens correctly. Then screw the battens into place completely with galvanised bulge head screws. If you just nail that battens into place and then add your roofing the whole roof including battens may come off in high wind or storms. As we live on the coast you must screw your battens down.
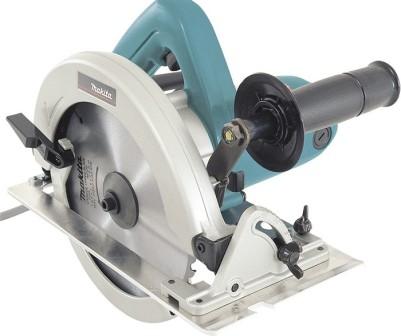 Right: Makita 1050W Circular Saw: $109.00; 185mm, Aluminium base plate, Includes 2 blades.
8. Roofing can be ether polycarbonate or metal. There are some polycarbonate products which will offer a sunscreen as well as being transparent enough for you to enjoy the sky and trees above you, or the stars at night. The easiest way to finish your pergola off is to paint it first and then install the roof so the paint does not get on the roofing sheets.
9. Make sure you use proper fasteners when attaching and that they are close enough together to not cause wind to lift them. As we have used polycarbonate sheets we direct you to a page about their proper use and installation HERE.
10. Clean up your work area – done!
Traditional Pergolas have an open roof where flowering vines are trained to create flower bowers but as we have suggested utilising one of the awning kits, or building your own from wood to make it easier on yourself, you will need to think about whether you want to create some screening to add privacy and your own unique stamp on your al fresco nook, or as a framing to train flowering plants along.
Johnson Brothers Mitre 10 at Narrabeen, their Fencing and Landscape Depot, have a great range of Decorative and Privacy Screen panels, and these too, apart from being made from products that are built to last, and will inspire you to take something simple to something extraordinary.
If you want to keep your al fresco dining area open but still create a border definition of some kind, a row or creating a corner from long planter boxes and filling these with herbs you can lean from your chair and add to the salad, or fill with seasonal potted colour or train into native flowering plant hedges, may be the idea you’re looking for.
Now you have the outline of your al fresco area, and it’s roof, you need to decide what is going to go in it – a barbecue, some tables and chairs, perhaps even an outdoor heater of some kind for when it starts to get cool and you still don’t want to come in out of the salt air.
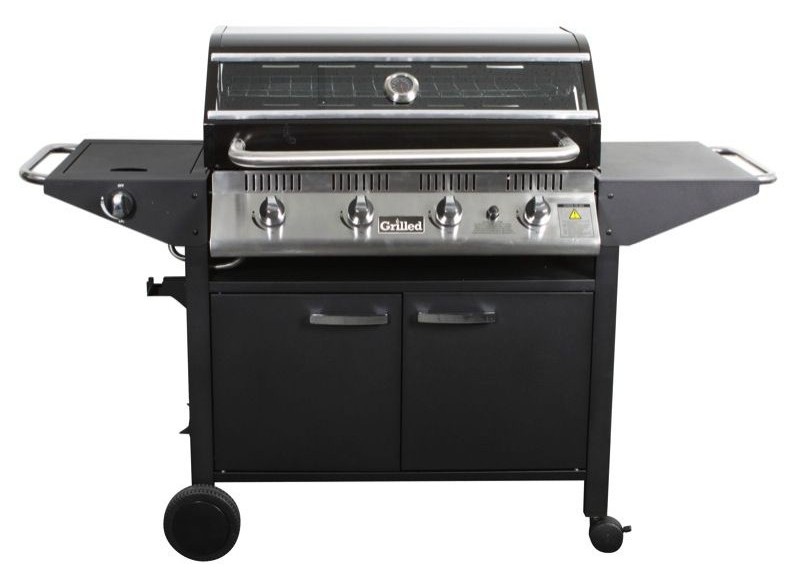
Grilled 4 Burner Hooded BBQ With Side Burner - $399.00: 116(H) x 153(W) x 67(D)cm. Vitreous enamel, twin skin roasting hood with glass viewing window. Auto ignition. Cast iron hotplate and grill. Gas cylinders not included with BBQ's. Accessories not included. All furniture and BBQ's require assembly.
We hope these ideas inspire you to get into your garden while it’s still warm and begin building your own cosy nook that you can enjoy even when it’s cold and for years to come.
The products shown in this page, apart from the roofing screw, which JBH stocks, are all from the current Johnson Brothers Hardware Mitre 10 Catalogue specials on sale 4th - 15th March 2015: you can access it online HERE
________________________________________________
Pittwater Council – Exempt and Complying Constructions
Awnings, canopies and sun or storm blinds on dwellings (a roof-like shelter of canvas, metal, timber or the like, located over a window or door for weather protection)
Maximum area 10 sq m per awning (an area 2 metres wide by 5 metres long would be 10 square metres- Ed.) Not to extend within 900mm of side or rear boundary in zones other than Non-Urban, or compliance with s3 cl 3.7 of the BCA Housing Provisions In residential zones not to extend within 10m of a main road; 6.5m of a secondary road; not to breach any de facto building line to adjoining dwellings In non-urban zones not to extend within 30m to a main road; or 20m to all secondary roads and public reserves Not to extend within 7.5m of side or rear boundary in 1(a) and 1(b) zones Not to extend within 6.5m of side or rear boundary in 1(c) zone Constructed of non-combustible materials if located in a bushfire area Does not preclude landscaping or tree growth Meets Requirements on page 13 & 14
Installed to manufacturer’s specifications; walls not included – supporting posts permitted Comply where appropriate with Australian Standard AS 3959 – 1991 Construction of Buildings in Bushfire Prone Areas. Standards Australia handbook HB 36 – 1993 Building in Bushfire Prone Areas. Ministerial Direction G20 Planning in Bushfire Prone Areas under Section 117 (2) of the Environmental Planning and Assessment Act.
Exempt in Region; 2, 3 and 5: Exempt in region 4: Maximum area 20 sq m per awning Located wholly on property Does not preclude landscaping or tree growth
Minor outbuildings, cabanas, gazebos, greenhouses, hobby sheds, garden sheds, and the like in Zones other than Non Urban
Maximum area 10 sq m Maximum height 3m Minimum for residential areas: • Max total site coverage including the new works: 40% • Min landscaped area: 60% • Rear and side boundary setback: one third of the wall height, minimum 1m, and does not breach any de facto building line • Max length of wall (within 3m of boundary): one third of boundary length • Darker, non-reflective wall and roof materials to match or complement existing dwelling • No additional shadowing of adjoining property.
Must be structurally adequate, installed to manufacturer’s specifications Comply where appropriate with Australian Standard AS 3959 – 1991 Construction of Buildings in Bushfire Prone Areas. Standards Australia handbook HB 36 – 1993 Building in Bushfire Prone Areas. Ministerial Direction G20 Planning in Bushfire Prone Areas under Section 117 (2) of the Environmental Planning and Assessment Act.
See all at: http://www.pittwater.nsw.gov.au/__data/assets/pdf_file/0004/6844/dcp22.pdf