DIY Beach, Garden and Camping Chairs – 3 Classic Portable versions anyone can make
 Summer is on its way and we will all be spending more time in the great outdoors. This week we’d like to share a few ideas to make relaxing on the sand or in the garden a little more comfortable.
 If you have children sitting upright at the beach while they build sandcastles, keeping that vigilant eye out, goes without saying. Apart from sculpting the sand to be a support for your back, not easy to do unless you’re sitting in the damp verges, you can buy one of those little foldaway beach chairs, camp stools or resort chairs.
To make one that will last, really last, choose timbers that wear well outdoors and stainless screws and when using fabric, a canvas or treated for outdoors material is a must – you can now purchase treatments should the bright colours or design you want not come pre-treated.
We provide basic measurements but these can be adjusted to suit your personal height or width preference.
They are all classic designs, some dating back from 100 years ago to younger, where we purposely sought plans and measurements to ensure we were offering the authentic pieces that were designed and built to last originals in their makers choice of fabric, timber and stain colour or paint. Apart from having to replace the material every decade or so, they should last another hundred years on top of that. Some have apparently. These stools and chairs may take a few hours or a day to do but you will have something unique that would costs hundreds when buying high quality outdoor use furniture made to last. Many would recognise these ideas being 'recycled' today with just as much success which proves great ideas go great distances - even through time!
Just to prove this point, our first plan comes from 1916, the second, a little more complicated, 20 years after that.
Some of these smaller portable stools may also be put to dual use as footstools or little tables for a cold drink beside the larger deckchair beneath your favourite shady tree. A good choice of wood or stain and fabric can make them functional furniture that is also ‘art’!:
The Johnson Brothers Mitre 10 items shown as part of this Classic Portable Chairs feature are from the current Locked Down Garden Prices range - and all classics ideas too, that have stayed with us because they work. Further inspiration to get outdoors and enjoy!
Basic Plank Stool
A PORTABLE STOOL.
Any boy can make this simple camp chair out of two pieces of wood and a small strip of canvas. The wood should be ordinary planking, about ½ in thick, 24 in. or 26 in. long, and of a suitable width. Halfway up each piece cut a rectangular slot, as shown in the picture, using Tor this purpose a saw and a chisel, or a fretsaw. Then, at the bottom of each piece of wood, saw out a wedge-shaped piece, so as to leave feet upon which the stool can stand, securely.
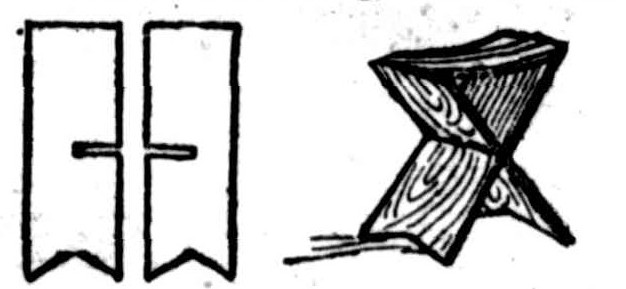
Now, provide the seat by nailing the canvas or carpet to the Wood. The material should be about 12 in long, and one end is nailed to the top of one piece of wood, and the other end to the second chair leg. In doing this, turn in the edge of the material, and use large-headed nails. The chair is now ready for use. All that needs to be done to set it up firmly on the ground is to fit the two slots to one another, allowing the legs to open as wide as the canvas will stretch out-. The wood ,may be stained or painted and, in order that it should look neat when finished, it is important that the slots should be sawn at a point exactly half-way up the legs, and that they should extend half-way through the planking. Then, when the two legs are fitted together, each will fit exactly into the other. For folding up, the legs are disengaged, and placed side by side. A PORTABLE STOOL. (1916, September 23). The Australasian(Melbourne, Vic. : 1864 - 1946), p. 48. Retrieved from http://nla.gov.au/nla.news-article140698769
Basic Plank Stool
A PORTABLE STOOL.
Any boy can make this simple camp chair out of two pieces of wood and a small strip of canvas. The wood should be ordinary planking, about ½ in thick, 24 in. or 26 in. long, and of a suitable width. Halfway up each piece cut a rectangular slot, as shown in the picture, using Tor this purpose a saw and a chisel, or a fretsaw. Then, at the bottom of each piece of wood, saw out a wedge-shaped piece, so as to leave feet upon which the stool can stand, securely.
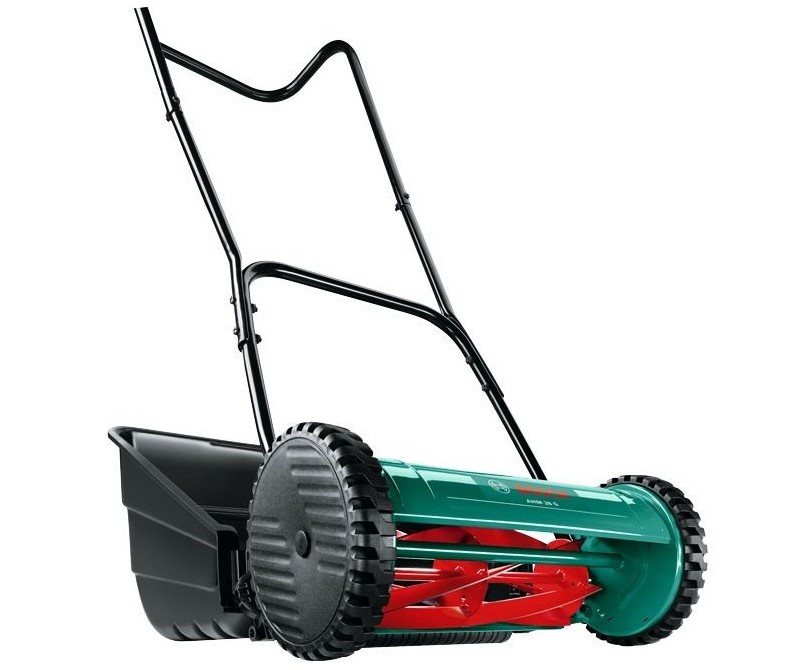
Bosch Hand Mower: $129.00 - 38cm push mower. 15-43(H)mm cut. Includes grass catcher.
Camping Stool – Vintage
Folding Stool for Camping or Fishing
By "CRAFTSMAN"
A FOLDING stool like the one illustrated will be found very useful when you go camping or fishing. It is easily constructed, and when folded occupies a space only 16in. by 11in., and 1 ½ in. thick. Either hardwood or a softer wood such as pine, may be used. Hardwood will last longer, but pine is more easily worked, and even a stool made of pine will last several years with proper care.. The stool has three main parts—the top, and two sets of legs, all of thaw being shown in the sketches. The top is made by cutting two pieces(AA) 10 ½ in. long, and nailing across them four slats (C), 10 ½ in. by 1 ½ in. The parts AA are 7 ½ in. apart- The sides of the Part 2 are 16 in, long, and they are placed outside pieces AA in part 1, so that they fit against them tightly. Two cross pieces (BE) ¾ in. wide, are nailed across near the bottom of the legs as shown. The other set of legs, shown as Part3, is then made to fit tightly outside Part 2. It is assembled from two pieces(FF), two cross pieces, and the rail H.
The piece H is 10 ½ in. by 1 ¼ in., and it is fixed in place with four small screws. The crow pieces, ¾ in. wide, are nailed to the legs and to each other. Make the top of the stool first, and then turn it down on the workbench, and build the other parts round it, just as If the stool were folded up flat. Bore a small hole through the centre of each leg, and fasten the two parts together with a 1 in. or a ¼ in. bolt and nut. If bolts and nuts are used, countersink the heads so that the top will fold down over them.
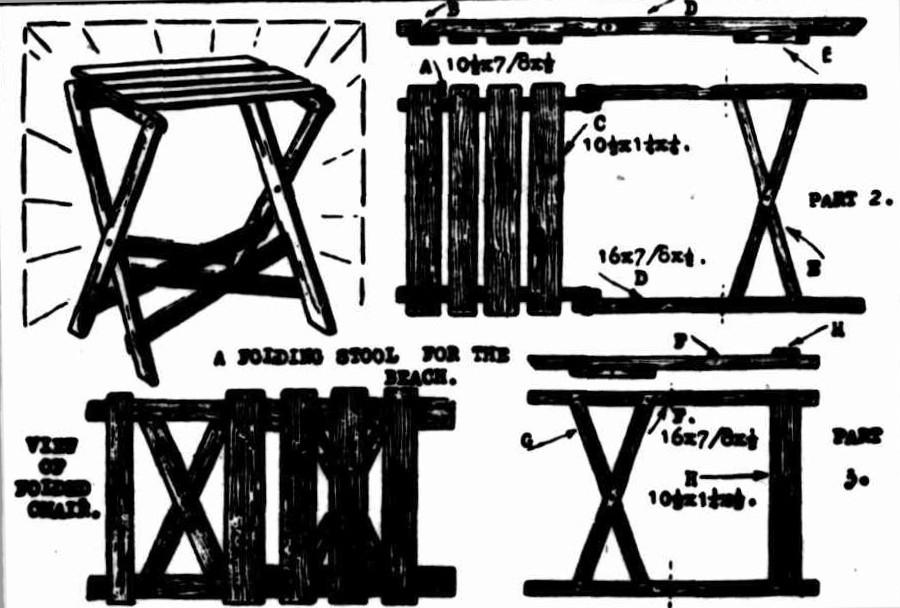
The seat is now fixed in the same manner to the top of part 2, with rivets or bolts throught both parts, as shown at J. The bottoms of the legs are cut at an angle so they rest flat on the ground when the stool is open. Then two slots (B) are cut in the lower edge of each part A so that about ¼ in. of the upper edge of H fits in it and holds the stool firmly open when in use. To cut this slot, bore a ¼ in. hole 1 2/4 in. from the end of A, and ¼ in. in from the edge, and then a saw cut a small piece of wood at the required angle. The finished stool should be painted or lacquered. This will improve its appearance, and make it last longer. As the stool will be used outside, the wood will need preserving with a coat or two of paint. Folding Stool for Camping or Fishing. (1936, December 10).The Queenslander (Brisbane, Qld. : 1866 - 1939), p. 36. Retrieved from http://nla.gov.au/nla.news-article23388934
Conversion rates of inches to centimeters for above folding stool:
16 in: 40.64 cm
10 ½ in: 26.67cm
7 ½ in: 19.05cm
1 ½ in: 3.81cm
1 2/4 in: 3.81
¼ in: 0.635cm
Folding Stool for Camping or Fishing
By "CRAFTSMAN"
A FOLDING stool like the one illustrated will be found very useful when you go camping or fishing. It is easily constructed, and when folded occupies a space only 16in. by 11in., and 1 ½ in. thick. Either hardwood or a softer wood such as pine, may be used. Hardwood will last longer, but pine is more easily worked, and even a stool made of pine will last several years with proper care.. The stool has three main parts—the top, and two sets of legs, all of thaw being shown in the sketches. The top is made by cutting two pieces(AA) 10 ½ in. long, and nailing across them four slats (C), 10 ½ in. by 1 ½ in. The parts AA are 7 ½ in. apart- The sides of the Part 2 are 16 in, long, and they are placed outside pieces AA in part 1, so that they fit against them tightly. Two cross pieces (BE) ¾ in. wide, are nailed across near the bottom of the legs as shown. The other set of legs, shown as Part3, is then made to fit tightly outside Part 2. It is assembled from two pieces(FF), two cross pieces, and the rail H.
The piece H is 10 ½ in. by 1 ¼ in., and it is fixed in place with four small screws. The crow pieces, ¾ in. wide, are nailed to the legs and to each other. Make the top of the stool first, and then turn it down on the workbench, and build the other parts round it, just as If the stool were folded up flat. Bore a small hole through the centre of each leg, and fasten the two parts together with a 1 in. or a ¼ in. bolt and nut. If bolts and nuts are used, countersink the heads so that the top will fold down over them.
Conversion rates of inches to centimeters for above folding stool:
16 in: 40.64 cm
10 ½ in: 26.67cm
7 ½ in: 19.05cm
1 ½ in: 3.81cm
1 2/4 in: 3.81
¼ in: 0.635cm
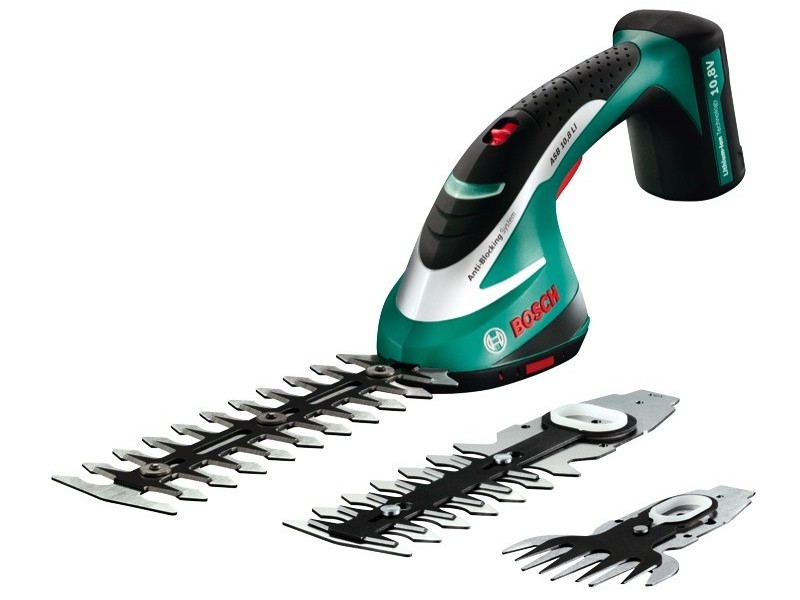
Bosch 10.8V Li-Ion Cordless Hedge Trimmer: $139.00 - 12cm shrub blade for sculpting, 20cm blade for trimming and grass blade. SDS blade change.
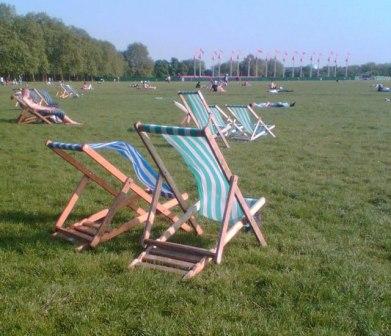
Classic Deck Chair or Beach Chair (sling back)
These used to be called, and came from the Classic Deck Chair, and as this plan and method produces something that will last for decades we use a plane from decades ago. There are two sizes offered here that both work on the same basic principles. These were found in children’s sections of old newspapers, so they would suit the beginner as well as projects youngsters and oldsters can do together!
We recommend you use a wood that will do well in outdoor elements, sand and stain before putting the pieces together, and for material, a canvas will wear better. If made well, this will last for decades and all you would need to do is replace the material as that wears thin.
Inches to centimetres measurements converted below in the materials lists for those born after 1965…
AMATEUR CARPENTER
HOW TO MAKE A DECK CHAIR
ONE of the most suitable articles a beginner can make is an ordinary deck chair. Much care should be exercised in planing to make the surfaces smooth and square. If precautions are also taken with the boring, sawing, and general finish, a useful article will be produced.
The chair represented here by the two views — side view and front view —is of simple design, and will present no difficulties in construction. Sound rails have- been used throughout, and the one in the rack will grip efficiently, if it is prepared in the manner shown here. It will fold up when not in use, as shown by the dotted curves AB, CD, and EF., Canvas 18 in. wide, fitted either single or double, will be found most suitable for this chair. The length required for the single fitting is a yard and a-half, which allows for rolling around each rail. Prepare the sides out of 2 in. by 1in. rough, pine, cut two pieces each 4ft., 3 ft. 5J in., and 1 ft. 9 in. Place them in pairs and square lines across at the measurements shown in the 6 side view. A 1 ½ in. round rail may be used for the canvas rails and 1 in. elsewhere.
Bore a hole for the roundings, slightly less than the rounding itself, and when the Din is worked a shoulder is left, as shown at Figure 2. This prevents the rail slipping through the stile. Work the round rail by marking a circle on the ends with a brace and bit, cut beside this circle with the saw down to the shoulder line, and afterwards carefully cut the shoulder on a bench hook.
Now rasp off the edges until the pin fits tightly in the hole. This round tenon may be wedged, held in position with a 1 ½ in. screw or nail, after gluing. Always bore the holes half-way through from both sides, after having squared and gauged the centre points. The round rails may be purchased, prepared, or made by the worker.
Square the timber to the full size and rule diagonals on both ends. Set the marking gauge at a distance equal to half the length of the diagonal. Gauge lines on all faces, and plane off, the corners until the piece is octagonal.
Draw a circle on each end, and work off the remaining edges with the plane, being careful not to remove the circle. Finally scrape and sandpaper until a neat rounding is obtained. This method of rounding will bring success if carefully followed.
Figure 1, A and B shows how to set out the octagon and circle. When working the racks set off the distances shown on the detail.

DETAIL SHOWING RACK
Find the centres for boring and clamp a piece of wood tightly on the edge, to support the bit while boring and prevent breaking the edges off the timber. After boring cut the remaining piece out with a tenon saw, and finish with a file and sandpaper. The bolts may be ¼ in. or ½ in. in diameter. Glue the frames together.gently cramp up the shoulders with a sash cramp, test diagonally with a rod ,for squareness, and look across the long sides to see if they are parallel; it not, press on the high corners until true. Unless this is done the chair will not. stand evenly on the floor.
Clean up the outer surface with the plane, after fitting together.
Make the inner frame, that is, the one having the rack, 1-16 in. narrower than required, so that it will work freely, and also prevent scraping the paint or varnish, which should be laid before assembling. The following timber, all rough pine, is required for this chair:
No. Length. Size.
ft. in. in. in.
Long stiles .. 2 4 0 2x1
Short stiles .. 2 3 5 ½ 2x1
Rack stiles .. 2 1 0 2x1
Long rails .. 1 1 10 ½ ¼ x ¼
Long rails .. 1 1 10 ½ 1x1
Short rails .. 1 1 8 ½ ¼ x 1¼
Short rails .. 1 1 8 ½ 1x1
Rack rail .... 1 2 0 ½ 1x1
AMATEUR CARPENTER. (1932, December 29). The Central Queensland Herald (Rockhampton, Qld. : 1930 - 1956), p. 13. Retrieved from http://nla.gov.au/nla.news-article70304895
CHILDREN'S HOBBIES
Things to Do and Make
By Handicraft
FINE DECK CHAIR. ANYONE CAN MAKE IT
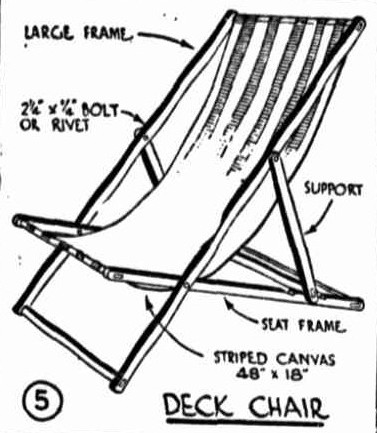
Most people have enjoyed the comfortable experience of relaxing in a deck chair, so there is little need to explain Its merits. It can be carried to any part of the garden or the verandah, and when not in use it can be folded up compactly and stored in some convenient place until it is wanted again. Any boy who is handy with tools can make a deck chair from a few common materials at very little cost.
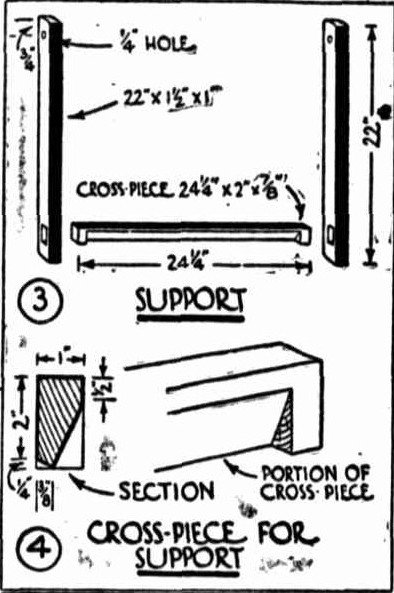
The chair consists of three frames, which are bolted together in such a way that they can be opened out or folded up at will. All of the side pieces of the framework can be made with 1 ½ in by 1in. hardwood of the lengths given in the various diagrams, and the crosspieces vary between 1 in and 7/8 in. and 2in. by 1in. Plane and finish off all of the timber to the correct size, and then you can set out the positions for holes to be drilled and the positions for the crosspieces. Keep the parts for each frame together until the construction is finished, so that they will not get mixed up.
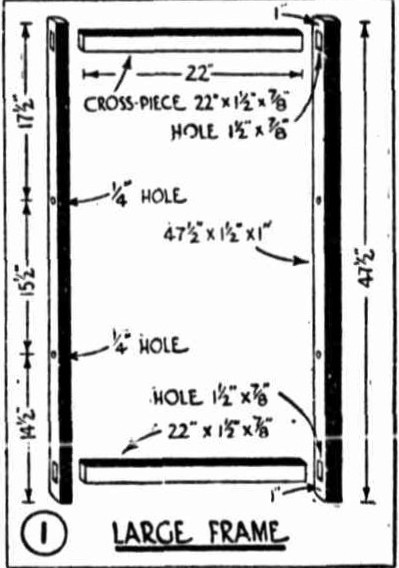
Make the largest frame first (fig. 1). At a distance 1 ½ in. from the top and bottom ends of the side-pieces, cut out 1 in. by 7/8 in. holes to take the two cross-pieces, which measure 22 in. by 1 ½ on. by 7/8 in.
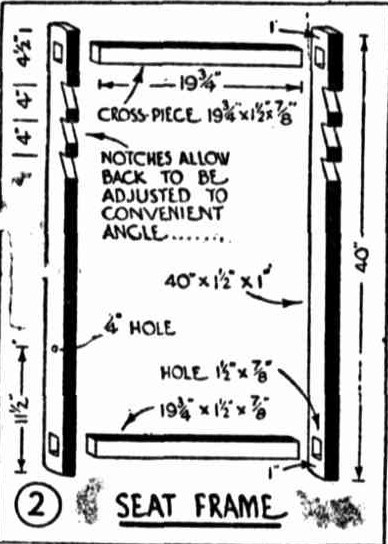
The second frame (fig, 2) is made in just the same way as the first, except that the cross-pieces should be 19 ¾ in. long, only one ¼ in. diameter hole is drilled in each side-piece, and three notches cut out of the lower ends. It is best to cut out these notches after assembling the three frames, so that exactly the right angles can he gauged from the cross-piece of the support. Round off the sharp edges of the cross-piece where the canvas folds over.
The bottom rail (fig. 4) can be made first and fitted into rectangular holes, as shown In fig. 3, or else you can plane the bevel along the entire length of the rail, after which the outline can be traced on to the side-pieces with a scriber or a sharp-pointed knife. Drill holes in each corner of this shape, and then you can cut to the lines with a chisel or a keyhole saw.
Converted Materials and measurements
¼ in: 0.635cm
¾ in: 1.905cm
7/8 in: 2.2225 cm
1 ½ in: 3.81 cm
2 ½ in. by ¼ in. : 6.35cm x 0.635cm
Large Frame
2 x 22 in crosspieces: 2 x 55.88cm
2 x 47 ½ lengths (sides): 2 x 120.65 cm
Seat Frame
2x 19 ¾ in crosspieces: 2 x 50.165 cm
2x 40 in lengths (sides): 2 x 101.6 cm
Canvas
48in x 18in: 121.92cm x 45.72cm
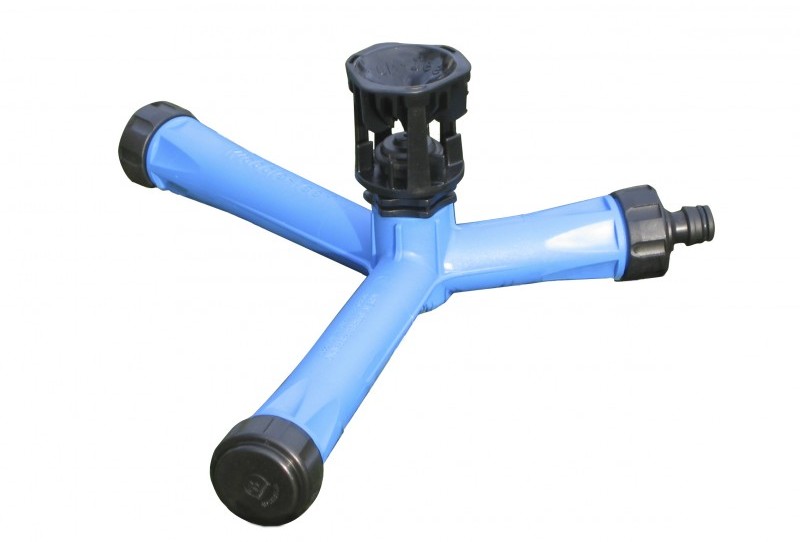
Wobble Tee Lawn Sprinkler: $39.00 - Waters up to 15m diameter. Water efficient design.
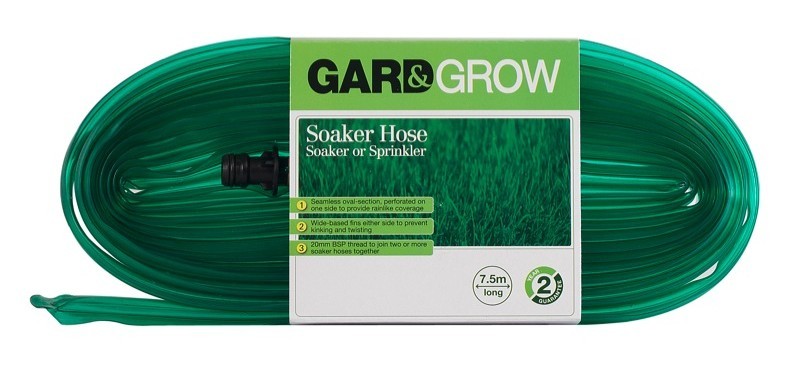
Gard&Grow® Soaker Hose: $5.59: 7.5m. Soak garden or turn upside down to sprinkle
Pope Jackaroo Hose: $14.84 - 12mm x 15m. Perma fit click-on connections. 5 year guarantee.
Next we will look at how to build some easy to make outdoor we have put together over the years that has also lasted the tests of time.
And just because this was the new fad for local beach seating in coastal areas in 1889, one you probably won’t make but still see versions of today:
Chair for Use on the Sea Beach.
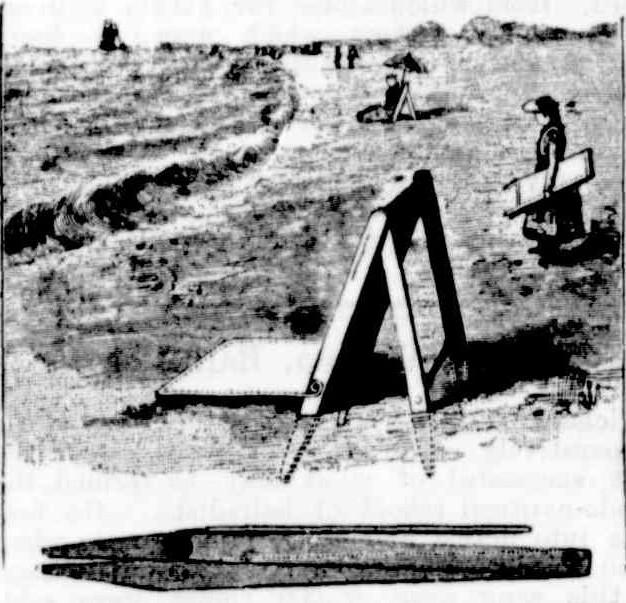
Our illustration represents a chair designed to afford the occupant a comfortable back rest and a waterproof seat ; the seat to be supported when in use by the sand of the beach, and be level therewith, so that the occupant may recline comfortably without danger from the dampness. The side pieces of the backrest and of the bracing frame are beveled off at their lower end to form legs which may ' be driven down until the seat is brought level with the sand. Over the frame formed by the side pieces is stretched canvas to form a back rest ; and the seat is composed of a frame, preferably of galvanised iron wire bent into the desired shape, and secured to the ends of the lower round of the back: frame-a vulcanised rubber-coated fabric being secured to the seat frame to make a seat impervious to water and moisture. The small figure shows this chair in folded position, for conveniently taking it to and removing it from the beach. Chair for Use on the Sea Beach. (1889, December 7).Australian Town and Country Journal (Sydney, NSW : 1870 - 1907), p. 31. Retrieved fromhttp://nla.gov.au/nla.news-article71126707 
Rockwell 139CC Lawn Mower: $229.00 - 16 chassis. Hard plastic catcher. Ball bearing wheels. 3 year warranty.
Click on logo to visit Johnson Brothers Mitre 10 website
Johnson Bros Mitre 10 - Avalon (02) 9918 3315
Johnson Bros Mitre 10 - Mona Vale (02) 9999 3340
JBH Timber & Building Supplies (02) 9999 0333
JBH Fencing & Landscape Supplies (02) 9970 6333