August 9 - 15, 2015: Issue 226

DIY One Shelf Open Sideboard
If you have ever wanted to build your own furniture this simple idea may be a good place to start.
This idea celebrates the timber used and will last for decades, even longer. Ours was built 16 years ago from old Oregon Structural Beams but you can still purchase hardwoods that make a feature piece in any home. The timber you choose, and the finish you apply, determines how the piece will look and what colour it will be. Johnson Brothers Mitre 10 at Mona Vale have a wide range of hardwoods – visit and speak to the friendly trained staff in this department and they can advise you on what may work best for what you want to build.
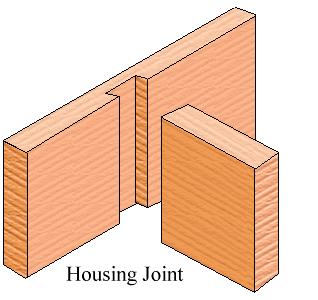
The main skill you will need to pay attention to in this DIY project is making what are called ‘Mortice’ or ‘Housing” joints – that’s where the pieces of wood are fitted together. You can also apply a nice indent or ‘groove’ to the edge of the wood
The version we’ve used is known as a housing joint. A housing joint is used when the entire width of a board is to be slotted into another. Housing joints are perfect for shelving as they distribute the force applied evenly over the length of the joint.
Although there are many joint variations, the basic mortise and tenon comprises two components: the mortise hole and the tenon tongue. The tenon, formed on the end of a member generally referred to as a rail, is inserted into a square or rectangular hole cut into the corresponding member. The tenon is cut to fit the mortise hole exactly and usually has shoulders that seat when the joint fully enters the mortise hole. The joint may be glued, pinned, or wedged to lock it in place.
This joint is also used with other materials. For example, it is a traditional method for stonemasons and blacksmiths. (1)
 Irwin 8 Point Hard Hand Saw: $9.98 - 500mm, 8 point, Constructed from 0.85mm premium cold rolled Swedish steel, Surface treated for 4 x better rust resistance, Hardpoint razor sharp teeth - last 6 times longer than non-hardened teeth
Tools
Router – to make groves in edge of shelves - or Hand Plane
Hammer
Chisel
Saw
Eye Safety Protection
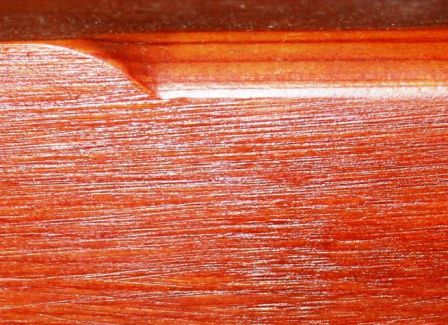 Step1: Putting shallow groove into edge of shelf with a Router makes your simple sideboard have a little extra polish. Sand wood edges smooth before routing with edge trimming bits, make sure you are using a sharp bit and running the router and work from left to right, that way, the bit pushes the router toward you rather than pulling it away, so it's easier to control and safer.
It can also be good to test making a shallow groove on scrap wood to begin with – that way you can see if you have set the router at the depth you want before ruining your main piece. Another tip is to remove a little at a time – this will prevent the router scorching or burning the timber.
The indent here has been sanded along the edge for added final smoothing. If you are not confident using a router, either leave this step out or use a Hand Plane – but once again – test depth on a practice piece of wood.
Step 2: Mark out a channel with lines across the face where you want the housing joint to be on your legs first. The width of the channel will be the same width as the timber to be inserted into it (8cm in this case). The height between the top shelf and the middle shelf on our piece is 41 cm but you can modify this to suit yourself as long as you bear in mind that the strength or integrity of the piece of furniture needs to be balanced by where you place the joints – keeping these as near to ‘square’ as possible makes it stronger.
Step 3: Cut along the lines with a saw or you can use a table saw for more accuracy. Only cut the channel about half of the depth of your piece of timber: a router could also be used to do this.
Step 4: Once you have cut the channel you now use a chisel and hammer to clean out the excess timber so that the other piece of timber can be inserted into the joint.
Step 5: Clamp up the joint with adhesives and wait until it dries. You can also apply screws and nails to increase strength or to help the joint when applying an adhesive.
Step 7: Cut the channel and again use a chisel and hammer to clean out the excess timber so that the other piece of timber can be inserted into the joint.
Step 8: Clamp up the joint with adhesives and wait until it dries.
 Step 9: Give the piece the sandpaper treatment to bring out the grain – it is a good idea to wrap the sandpaper around a flat piece of wood and keep this flat against the timber so you don’t create unwanted deeper grooves on some parts than on others.
Steps 10: Make sure you have cleaned all wood dust from every surface with a dry soft cloth. Apply finish oil or stain of your choice – if you have obtained a beautiful piece of timber it is that colour you will want to retain.
1. Mortise and tenon. (2015, August 5). In Wikipedia, The Free Encyclopedia. Retrieved from https://en.wikipedia.org/w/index.php?title=Mortise_and_tenon&oldid=674737064
This joint is also used with other materials. For example, it is a traditional method for stonemasons and blacksmiths. (1)
For ours - adapt to suit what you want, we used:
Materials
1 x 224 (length) x10cm (thickness) x 41cm (width) cm – Top shelf
1 x 188 (length) x 10cm (thickness) x 41cm (width cm – Inner shelf
2 x 78 (length) x 8cm (thickness) x 41cm (width) cm – Legs
Wood glue
Stain or varnish of your choice
Sandpaper
Materials
1 x 224 (length) x10cm (thickness) x 41cm (width) cm – Top shelf
1 x 188 (length) x 10cm (thickness) x 41cm (width cm – Inner shelf
2 x 78 (length) x 8cm (thickness) x 41cm (width) cm – Legs
Wood glue
Stain or varnish of your choice
Sandpaper
Irwin 8 Point Hard Hand Saw: $9.98 - 500mm, 8 point, Constructed from 0.85mm premium cold rolled Swedish steel, Surface treated for 4 x better rust resistance, Hardpoint razor sharp teeth - last 6 times longer than non-hardened teethRouter – to make groves in edge of shelves - or Hand Plane
Hammer
Chisel
Saw
Eye Safety Protection
Step1: Putting shallow groove into edge of shelf with a Router makes your simple sideboard have a little extra polish. Sand wood edges smooth before routing with edge trimming bits, make sure you are using a sharp bit and running the router and work from left to right, that way, the bit pushes the router toward you rather than pulling it away, so it's easier to control and safer.It can also be good to test making a shallow groove on scrap wood to begin with – that way you can see if you have set the router at the depth you want before ruining your main piece. Another tip is to remove a little at a time – this will prevent the router scorching or burning the timber.
The indent here has been sanded along the edge for added final smoothing. If you are not confident using a router, either leave this step out or use a Hand Plane – but once again – test depth on a practice piece of wood.
Step 2: Mark out a channel with lines across the face where you want the housing joint to be on your legs first. The width of the channel will be the same width as the timber to be inserted into it (8cm in this case). The height between the top shelf and the middle shelf on our piece is 41 cm but you can modify this to suit yourself as long as you bear in mind that the strength or integrity of the piece of furniture needs to be balanced by where you place the joints – keeping these as near to ‘square’ as possible makes it stronger.
Step 3: Cut along the lines with a saw or you can use a table saw for more accuracy. Only cut the channel about half of the depth of your piece of timber: a router could also be used to do this.
Step 4: Once you have cut the channel you now use a chisel and hammer to clean out the excess timber so that the other piece of timber can be inserted into the joint.
Step 5: Clamp up the joint with adhesives and wait until it dries. You can also apply screws and nails to increase strength or to help the joint when applying an adhesive.
Step 6: Choose which surface you want for the upper part of the Top Shelf. Mark out the channel for the legs to slot into the Top shelf 8cm in from each end edge (so that you have an overhang).
Step 7: Cut the channel and again use a chisel and hammer to clean out the excess timber so that the other piece of timber can be inserted into the joint.
Step 8: Clamp up the joint with adhesives and wait until it dries.
Step 9: Give the piece the sandpaper treatment to bring out the grain – it is a good idea to wrap the sandpaper around a flat piece of wood and keep this flat against the timber so you don’t create unwanted deeper grooves on some parts than on others.Makita 200W Finishing Sander: $99.00 - Low vibration and low noise, Powerful 200w motor, Rigid aluminium foot with dust proof sponge seal for longer tool life, Built in dust extraction with dust bag, Easy installation and removal of paper with rolled clamper's edges Ergonomically contoured grip with non-skid rubber covered surface
Specials shown on this page are part of Johnson Brothers Mitre 10 current Locked Down Tool prices. There are many other great Specials on in store - call in today and get all you need for your DIY projects.

Makita 10.8V Li-Ion Mobile Kit; $250.00, QUICK OVERVIEW: Includes drill driver, impact driver, torch, 2 x 1.3Ah batteries, charger, 24 Piece bit set, holster and steel carry case.

Bosch 190W Multi Tool: $179.00; QUICK OVERVIEW: 15,000-21,000rpm, No-load speed, 2.8 degree Oscillation Angle, 4 step depth stop for segment saw blades, Continuously variable speed, Pre-selection for material specific working, Vibration reduction technology, Comes with 10 accessories.
________________________
Reference1. Mortise and tenon. (2015, August 5). In Wikipedia, The Free Encyclopedia. Retrieved from https://en.wikipedia.org/w/index.php?title=Mortise_and_tenon&oldid=674737064