June 29 - July 5, 2014: Issue 169
It’s school holidays time and we know how to keep the young ones happy and get them involved in making something for them, with your help of course! As soon as you hear that 'I'm bored!'... get out the wooden boards ..and lets get building!
For little boys and girls – there’s nothing like messing around with bits of wood! This is fairly easy to do, can be decorated with some great art of your children’s own choosing, can be made quite cheaply and they will get years of fun out of this. We recommend you ask the friendly trained staff at Johnson Brothers Mitre 10 for the best wood to use, something that will last in the great outdoors for a few years will work best. JBH Mitre 10 are also running their end of year sales at present too - so well worth having a look at what else you may need while in their stores.
 Things You'll Need
1 board, 38 mm × 184 mm x 1.8288 metres long
1 board, 38 mm × 184 mm, 3.04800 metres long
1 board, 38 mm × 89 mm, 3.04800 metres long
Measuring tape
Pencil
Circular saw
Palm sander or sandpaper
Hole saw
Jigsaw
Drill and bits
Post hole digger or shovel
Fast-drying cement
Construction adhesive
Wood screws
Galvanized pipe, 2.5400cm diameter, 27.940cm length
Pipe straps
Metal dowel, 20.320cm length, 63500cm diameter
Marine rope
Assorted non-toxic paints for decoration
Dust masks for protection from sawdust and paint fumes
1. Measure and cut the 38 mm × 184 mm, 3.04800 metres long board to 2.7432 metres with the circular saw. Repeat with the 38 mm × 89 mm, 3.04800 metres long board. Cut the remaining 38 mm × 184 mm x 1.8288 metres long into two .889 metres pieces. Sand all the edges smooth with the palm sander.
2. Measure and mark with a pencil 6.3500cm down from one edge on each .889 metres piece of wood. These pieces are the uprights that will be cemented into the ground. The measurements are for making the notches to hold the pipe.
3. Use the hole saw to make a 6.3500cm hole in each marked board. The marking made earlier shows where the bottom of the hole is. Use the jigsaw to cut out the remaining wood and create the notches. You will end up with a U-shaped opening on each board.
4. Find the center of the 38 mm × 89 mm board. Cut a U-shaped notch on this board using a 1 ¼ -inch hole saw, with the hole bottom being 3.17500 centimetres from the edge of the board. This board is the brace board for the seat of the seesaw.
5. Dig the holes for the uprights, using the post hole digger or shovel. Secure the uprights into place, with the notches facing each other, with the fast-drying cement. Leave 45.720cm of upright sticking out of the ground, with a spacing of 19.685cm between them.
Make a line down the center of the 2.7432 metres board. Place a bead of construction adhesive along this line. Place the brace board on this line, with the notched side down, making a closed hole. Let dry.
6. Turn the board over so the seat side is facing up. Reinforce the bracing by inserting screws every six inches with the drill and a screw bit.
Turn the board over again so the bracing is facing up. Slide the pipe through the notch and center it, with about 3.8100cm of overhang on each side. Secure the pipe into place with the pipe straps.
7. Make two marks at each end of the board, with the seat side facing up. These marks are 40.640cm from the end and 3.1750cm from each side. Drill out the marks with a drill bit that is slightly larger than the marine rope. This is for the handles.
Thread the marine rope through the holes, as if you were sewing. Knot the open end. Pull 15.240cm of rope through the top to make the handle. Cut the rope and knot the end. Repeat for the other side.
8. Drill 63500cm holes in the uprights above the notches. These holes travel through the wider part of the board, and will need a long drill bit to make them. This is where the metal dowel will go to serve as a locking pin for the seesaw.
9. Place the seesaw seat board onto the notches of the uprights. Slide the metal dowel into place on each side. Ask your children to decorate the plank as suits them. You may want to apply a clear varnish to protect their art works. The seesaw is now ready to use!
Please note that safety experts recommend small children are always supervised on all play equipment.
An older portable version:
For the Handyman - See-saw is fun for the youngsters
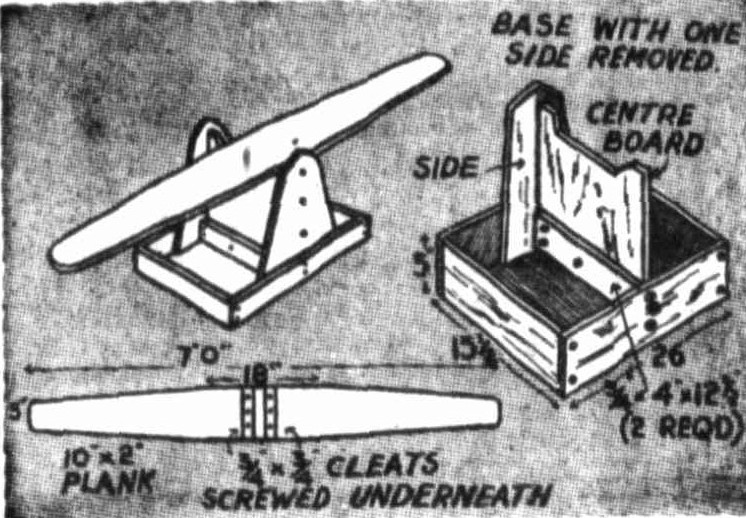
- Children get endless fun with a seesaw. Here is one you can make easily. It is portable and the plank lifts off, so that the whole thing can be moved around.
The base is made from timber, except for the centreboard on which the plank rides, which is cut from 1in hardwood. The base is made like a box, the idea being that you fill the box with sand to prevent it tipping. Be sure to get a sound piece of timber for the plank. Two cleats (wooden strips)screwed in the middle on one side provide a guide channel, so that the plank will rest on the base without clipping. The channel is 1 ½ inches wide. Round the ends of the plank, then sandpaper It smooth to prevent splinters. The sketch shows the construction of the base ' with one side removed to make the details clear.
Cut the two sides from ¾ in timber 18in long, 6in wide at the top and 8in wide at the bottom. The sides are screwed to the centreboard. The centreboard Is 12 ½ in wide and 17 ½ in long. It has a shallow cut-out at the top, 1 in deep and 10in long in which the plank fits. Board in the bottom of the base. Use screws throughout in assembling the base. Paint the seesaw in gay colors. For the Handyman. (1954, August 28). Daily Advertiser (Wagga Wagga, NSW : 1911 - 1954), p. 5. Retrieved from http://nla.gov.au/nla.news-article145688145

Products advice is available from the trained friendly staff at Mona Vale and Avalon Johnson Brothers Mitre 10.

Previous DIY Pages:
Decking Timbers Caring For Your Deck Decking Finishes Privacy Screens I Privacy Screens II Privacy Screening Hardwoods Autumn Paths and Lawns Insulation Batts Plasterboard Ventilation - Edmond's Ecofan Blackboards for Children and Home Spring Lawn Care Shade Sails & Watering Basic DIY Tools DIY Tools - Power Drills Recycle Your Trampoline into An Air Bed How to Build Your Own Backyard Cricket Pitch Christmas Lights Displays around House and Garden Summer Mildew - Refresh, Renew How to Fix Things That Drip and Bump in the Night Time To Plant Winter Vegetables – Raised Garden Beds Layout Orgainsing Your Tool Shed Make Your Own Weathervane Installing A Garden Watering System Decking Oils How To Make Garden Compost How To Winter proof Your Lawn How to create Shabby Chic effect on Timber Furniture How to Build Your Own Raised Garden Bed Growing Your Own Winter Vegetables Winter Heating Guide Prepare Your Yard For Winter Eradicating Noxious Weeds From Your Yard How to Fix Furniture Finishes Part I How to Repair Scratches, Dings, and Dents of Furniture Surfaces - Part II Make Your Own See Saw
Copyright JBH Mitre 10, 2013. All Rights Reserved .