July 13 - 19, 2014: Issue 171
 If you have a wood pile accumulating from leftover bits of rejuvenated decking some of these lengths of wood may have sections that are reusable. You could use leftover decking boards in making this versatile classic.
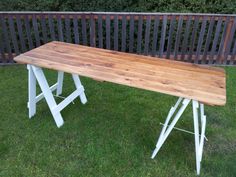
If you don’t have leftover decking you can buy new wood and make something strong, durable and portable for use as a pop up table outside when barbecue season arrives, as a classic desk for those who need more elbow room or as a potting table for the garden. Made of two trestles and a slatted timber top, this table measures 1.8m x 780mm but the length can be varied to suit by altering the length of the boards/timber lengths and adjusting position of cross-braces for the tabletop.
Our materials list is for Treated Pine (best for outdoors use) – but you can always talk to the trained friendly staff at Johnson Brothers Hardware Mitre 10 about the other beautiful woods available at Hardwoods Australia at Mona Vale and choose something that may look better varnished, and be for indoor use. Many of these timbers have a lovely grain and colour – allowing you to build a unique handcrafted table you will happy to sit up to.
We have listed green or white acrylic paint for the final coats for protection for a table for outdoor use but as always, you can get your children involved if you have various leftover colours and create something the whole family has made!
Whatever you use it for, it’s a good season to get outdoors and get busy making something you’ll be happy you’ve completed and can be put to use for years to come.
Materials
Pencil
Ruler or tape measure
Square
90mm x 20mm Treated pine: 2 x 3.1m (legs)
2 x 2.5m (cross braces for trestles)
90mm x 20mm Treated pine: 10x 1.8 x 780mm (table top)
90mm x 20mm Treated pine: 5 x . 775mm (for table top cross braces x 3 + 2 x for slats for trestles)
4 clamps
Power saw or hand saw
Drill
Countersink bit
48 x 32mm screws (legs)
110 x 35mm screws (table top)
24 x 25mm wood screws with countersunk head (hinges)
4 x 75mm fixed pin hinges
2m x 5mm diameter rope
Green or White acrylic paint
Paintbrush
Goggles, gloves and Protective Dust mask
If making new from hardwoods for indoor use - varnish or resin for French polishing (easier than you think!) - we'll run this part in our next DIY page Issue 173
Trestles
Step One:
For the legs cut 3.1m timber lengths into 8 x 750mm lengths. For cross braces, cut 2.5m lengths into 8 x 600mm pieces. Remember; as the builder around here says, learned from generations of builders – ‘measure three times and cut once!’
Step Two:
Clamp legs and cross braces. Place lower cross brace 200mm from bottom. Drill three holes in each join.
Step Three:
Countersink holes to the size of the screw head so the head will sit flush.
Step Four:
Position hinge centrally on top of leg. Drill holes and screw in 3 x 25mm screws – repeat process for other leg. Lay two completed trestles top to top (Flat). Drill and screw down the opposite sides of the hinges.
Step Six:
Drill a hole in the centre of the lower cross beams and thread rope through, check stance of trestle and make sure you have a firm ‘A’ frame. Cut rope at same length for other trestle and repeat process so you have trestles that match each other and have a balanced ‘even keel’ prior to knotting rope at ends. You can also bevel the base of these trestles so they sit flush on the floor.
Step Seven:
Paint trestle legs two- three times for protection.
Table top
1.8 metres by .780 metres version using old Decking Boards or use New Lengths of wood. If you are using older Decking boards, allow for variation in the width of the boards, don’t cut the cross-braces to length until half the boards are attached.
Step One:
Square up the timber – lay out timber lengths and use a length of straight wood to align ends against.
Step Two:
Mark the brace positions (‘brace’ means the crossing length of wood that shall hold table together and where trestles slot in) – this DIY Trestle Table plan stipulates three for strength and balance – the two outer edge ones will have a second applied inwards(in from outer brace) for the trestle slots.
Measure and mark the position for two cross-braces using a builder's square and measuring tape. The two outside braces are to be 300mm from each end and a third is in the centre. Indent (move in) the braces 5mm on each side from the edge of the top.
Step Three:
Screw-fix the braces: Attach the cross-braces to the boards with 35mm screws. To keep it square, attach one board at a time using a 2mm-thick washer as a spacing guide. Use the tip of the driver bit to countersink each hole before turning the screws. Use three screws at the end of each brace and two for other boards.
Step Four:
Slip in Slats for Trestles beneath Table – Measure across top of trestle when standing in A Frame. We suggest testing squareness of fit before drilling 2 x 8 into each board and your 3 x screws at end of boards.
Once built, paint with three coats of exterior gloss acrylic or let the littlies loose, with masks and gloves, for creating something fantastic! Others may prefer sanding back the paint slightly to create a distressed look.

Products advice is available from the trained friendly staff at Mona Vale and Avalon Johnson Brothers Mitre 10.

Previous DIY Pages:
Decking Timbers Caring For Your Deck Decking Finishes Privacy Screens I Privacy Screens II Privacy Screening Hardwoods Autumn Paths and Lawns Insulation Batts Plasterboard Ventilation - Edmond's Ecofan Blackboards for Children and Home Spring Lawn Care Shade Sails & Watering Basic DIY Tools DIY Tools - Power Drills Recycle Your Trampoline into An Air Bed How to Build Your Own Backyard Cricket Pitch Christmas Lights Displays around House and Garden Summer Mildew - Refresh, Renew How to Fix Things That Drip and Bump in the Night Time To Plant Winter Vegetables – Raised Garden Beds Layout Orgainsing Your Tool Shed Make Your Own Weathervane Installing A Garden Watering System Decking Oils How To Make Garden Compost How To Winter proof Your Lawn How to create Shabby Chic effect on Timber Furniture How to Build Your Own Raised Garden Bed Growing Your Own Winter Vegetables Winter Heating Guide Prepare Your Yard For Winter Eradicating Noxious Weeds From Your Yard How to Fix Furniture Finishes Part I How to Repair Scratches, Dings, and Dents of Furniture Surfaces - Part II
Copyright JBH Mitre 10, 2013. All Rights Reserved.